Today the new eve-ng pro (v2.0.5-20-PRO) was released, hours later v2.0.5-21-PRO was released including the latest bugfixes. It has some major improvements in regards to usability (with a brand new notification bar) and CPU optimization.
You might have noticed the new login message (Steph Edition) after the update. Stephan was the EVE Logo Designer and recently passed away at the age of 35 so this is a tribute for him in this release.
More info about the changes made in this release (like the new notification bar) will follow soon so make sure to get back here from time to time 😉
I get this Question a lot – the vSRX is taking almost 100% of the CPU. But why is that?
This happens if you are using the vSRX on a “DPDK-Host” – The CPU cores will be constantly polling for packets, and they will be displayed as 100% busy in the output of “top”, simply because on DPDK Hosts, the vSRX runs in “polling mode”. The Docs will tell you this:
“vSRX runs DPDK in polling mode, and thus consumes all available CPU. The vFP uses DPDK to continuously poll the NIC queues for new packets, so cores allocated to the NIC queue processing are locked at almost 100% CPU usage all the time. It doesn’t matter if you have 1pps of traffic or 100Mpps.
As you can see, this behavior is normal and should not alert you – on Hardware, where vSRX is not depending on DPDK, the CPU usage reduces drastically because the vSRX does not have to poll the Packets. This is called “interrupt based” where the hardware sends a signal to the CPU once a new packet arrives that has to be processed.
Among the various VPN protocols, Layer 2 Tunneling
Protocol (L2TP) is one of the most secure. Moreover, it is incredibly easy to
set up.
Taken alone, L2TP is simply a tunneling protocol
(facilitates end-to-end communication) that allows remote clients to use a
public network to communicate within a private network. To provide the required
encryption; it is paired with IPsec which is a security protocol.
L2TP was developed in the 90s by both Cisco and
Microsoft. The two companies came together out of a need to develop a protocol
that would improve on the individual protocols that each company had developed.
Before L2TP, a Microsoft employee had developed the
first ever tunneling protocol—Point-to-Point Tunneling Protocol(PPTP). The main
reason the Microsoft employee developed the protocol was to allow users to work
effectively and securely from home via a secure internet connection.
Unfortunately, PPTP, though effective, was not
perfect. For one, due to the technology of that time, it had weak encryption.
Second, the protocol did not and still does not recover as quickly as others
over unstable network connections.
To try and improve on the weaknesses of PPTP, Cisco
came up with Layer 2 Forwarding (L2F) protocol. L2F, according to Cisco, was
meant to tunnel Point-to-Point communications over an IP and create a dial-up
link across a network.
Similar to PPTP, L2F had significant weaknesses such
as low support for different devices and weak encryption. Therefore, Cisco and
Microsoft came together in a bid to create a protocol that wouldn’t have some
of these glaring weaknesses. They succeeded because they created L2TP/IPsec
which is still in use today.
The differences between
L2TP and PPTP/L2F
As noted above, L2TP is pretty much an extension pf
both PPTP and L2F. To differentiate between the three and understand why L2TP
is better, here are the differences.
The differences between L2TP and L2F include:
L2F lacks a defined client
L2F only works in compulsory tunnels (the tunnel
ends at ISP) while L2TP can use voluntary tunnels (the tunnel ends at the
remote client) which makes it flexible
L2TP has additional beneficial features such as
flow control
The differences between L2TP and PPTP include:
A PPTP connection only tunnels over IP while L2TP
is more flexible and can tunnel over a wide variety of media
A PPTP connection can only handle one tunnel
between two points. L2TP supports multiple tunnels between any two points, and
each tunnel will have its own quality of service (QoS)
The size of L2TP headers is as low as 4 bytes
while that of PPTP is larger
How L2TP/IPsec works
L2TP/IPsec uses a technique known as double
encapsulation to facilitate security. This unique feature is the reason
L2TP/IPsec first gained popularity. Essentially, the first encapsulation will
create a connection between two parties.
The second encapsulation, on the other hand, contains
the IPSec encryption which provides for security. Due to the double
encapsulation, it is impossible to tamper with a data packet while it is on the
move from one party to another.
That protects anyone who is using this protocol from a
man-in-the-middle attack. Man-in-the-middle attacks occur when an attacker lies
in wait and alters communication between two parties without their knowledge.
As a result, even though the two parties believe they are communicating with
each other, in reality, they are both communicating with the attacker who can
misinform, misdirect and cause harm.
Note that L2TP on its own without IPsec supports
several authentication options. One it supports Password Authentication
Protocol (PAP). Second, it supports the Challenge Handshake
Authentication Protocol and finally, Microsoft Challenge Handshake
Authentication Protocol (MS-CHAP). MS-CHAP is similar to CHAP with the only
difference being that it is proprietary to Microsoft.
The IPsec part of the
L2TP/IPsec protocol contains a 256-bit encryption key. A 256-bit encryption key
offers military-grade encryption that is next to impossible to break. Also, it
contains security algorithms that also help in improving security.
Strengths
Easy to set up due to minimal complexity
High levels of security due to double
encapsulation
Compatible with a large number of devices and
operating systems
Supports multithreading (execution of multiple
threads concurrently) which in turn enhances performance
Weaknesses
According to reports, it is possible the NSA has weakened the IPsec protocol in their bid to monitor what people are doing online. As a result, the protocol has weakened security to some degree
It is possible to block L2TP/IPsec because it runs on User Datagram Protocol (UDP) port 500
Double encapsulation reduces the speed by a significant margin
Shoutouts to Jeff Anderson from techwarn.com for this Guest Post – hope you guys enjoyed it.
It’s finally happening: In April, the Juniper DayOne Books will hit 1Mio downloads! A-m-a-z-i-n-g I tell you!
For this Special Event, Juniper has a lot to offer – check out the Site https://www.juniper.net/us/en/dm/day-one-million/ from time to time during April for special discounts and exclusive bundles.
But hey – why is your story in German you might ask. I did this because of 3 reasons.
First, most of the Germans are a bit lazy when it comes to interacting with others in English. Don’t ask me why (I’m not a typical German in many ways) but I experienced this over and over again. Therefore I decided that it would be interesting to add a little German to the stories so more “native” Germans would be able to see, how awesome this journey was for me. We were told that we could either write in English or in our native language – and guess what? Looks like I was the only one doing this 😀 Maybe we should start a “Multilanguage DayOne Book” where the books are either written in different Languages per recipe or we take one book and translate it into as many Languages as we can find? I would be in of course.
Second, diversity is great and it’s always a difference if someone has to write in his native language or in English (subtext is the buzzword here) and the more people contribute in other languages, the better. I love to learn new things – why not learn a few words of Spanish, French, Canadian, Italian or whatsoever?
There’s also a third reason for this – if you want to know it, feel free to reach out to me. Don’t worry – I rarely bite so it’s safe 😉
In case your German is a little rusty, here’s my Interview in English (you could also use google translate but yeah… Good Luck with that…):
###
“Ich erinnere mich noch sehr gut daran, als ich die Anfrage erhielt am Ambassadors Cookbook 2019 mitzuwirken. Natürlich fühlte ich mich geehrt – hatte aber zeitgleich auch wichtige Projekte vor mir, die nicht darunter leiden durften. Irgendwie schaffte ich es dann doch zwischen all den Projekten und meinem Expert-Nachtlab die beiden Artikel fertigzustellen. Ich tauschte mich dazu mit vielen Experten aus, die bereits Bücher veröffentlicht hatten. Da sich viele Kunden mit dem Thema MC-LAG auseinandergesetzt hatten, es aber immer wieder zu Problemen kam, entschloss ich mich, dieses Thema besonders zu behandeln. Ebenso nahm ich mit das Thema ZTP erneut vor, da auch dieses Thema meiner Meinung nach den Puls der Zeit trifft – hierfür hatte ich bereits wertvolle Erfahrungen bei unseren Kunden gesammelt und die Rückmeldungen waren gigantisch. Es ist meiner Meinung nach wichtig, dass es die DayOne books gibt und diese immer wieder einen Refresh erhalten. Diese Bücher helfen IT-Experten auf der ganzen Welt innerhalb kürzester Zeit wertvolles Wissen aufzubauen. Bei diesem Vorgang unterstütze ich natürlich gerne mit meinem Fachwissen.”
###
“I still remember the day when Patrick asked me if I wanted to contribute to the Ambassadors Cookbook 2019. I felt honored, but at that time I also had very important projects that I didn’t want to suffer because of my contribution. I managed it to somehow finish both of the recipes between the projects and my nightly Expert-Labs (JNCIE-DC is only a week away). Because MC-LAG was very popular at our customer’s setups but they faced a lot of issues mainly because of wrong setups I decided to give this topic special attention. Also, ZTP was a hot topic (and it’s still a hot topic) at the time of writing the recipes. I already learned a lot while working for our customers and the feedback was astounding. In my opinion, DayOne books are very important and they also need to be refreshed and re-released from time to time to be up-to-date. In my opinion, Juniper does this job very well and the authors are amazing. DayOne books help IT-Experts all over the world to build valuable knowledge and experience. And of course, I love to help with my knowledge and experience.”
###
Hopefully, there will be more “native” content in the future for all of us 🙂 My fellow ambassadors already mentioned some Ideas on Twitter – stay tuned.
What could be more refreshig than setting up a nice little EVPN-VXLAN on your vQFX just for fun? This blog post will show you how to do it and break down the important parts.
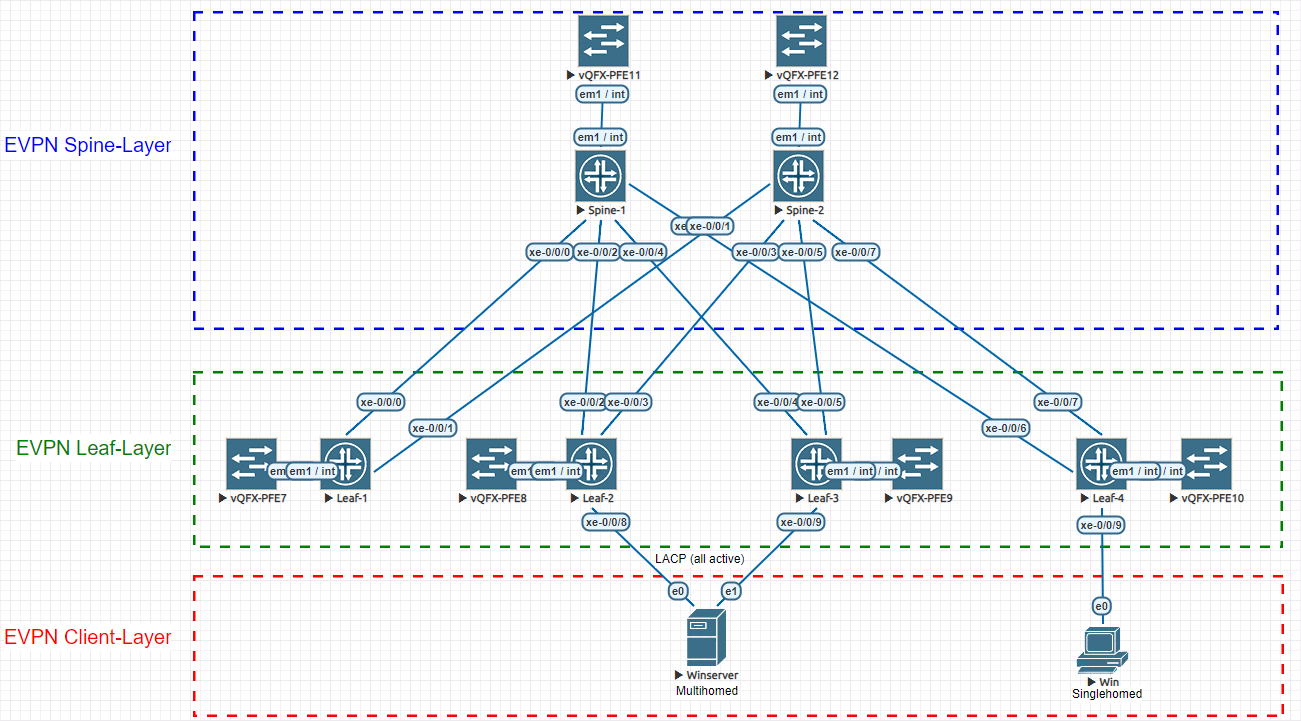
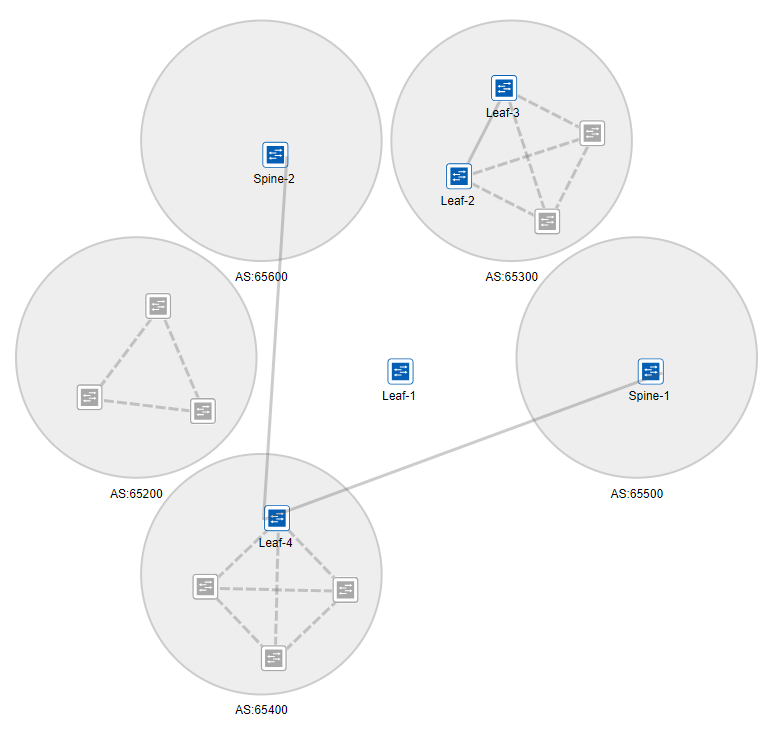
We will be looking at the following topology (designed on EVE-NG) and implement an EVPN-VXLAN spine and leaf config so that our virtual servers named Win and Winserver are able to communicate with each other. On top we will configure Winserver for multihoming:
In case you already know EVPN and just want to take a look at the sample-config, you can jump at the end of this blog post, where I post the full code for the setup (excluding Windows Server NIC-Teaming with LACP). If you want to know how to use NIC-Teaming on Windows Server 2016 simply go to google – there are tons of instructions (with LACP and without) but this setup uses one with LACP.
Step1: Create the Topology itself.
Before implementing EVPN-VXLAN you should carefully think about your setup. I’ve seen a lot of setups where the spine and leaf topology is placed “unoptimal” and later on might cause trouble. Therefore I advise you to think carefully about the topology itself and also about the surrondings that you might need (like route-reflectors or VC-Fabrics). Once you got that out of the way it’s time to sit down and build the setup and prepare the connections needed – for my tests I usually use EVE-NG because with EVE-NG it’s very easy to “patch” all the cords needed on the fly (with Pro even when the devices are powered on). I advise you to always PoC a setup like this to avoid unnecessary surprises when implementing it. Usually when prepping this and doing a PoC there are many things that you might see different after the PoC – this will help you to find the optimal setup for your company.
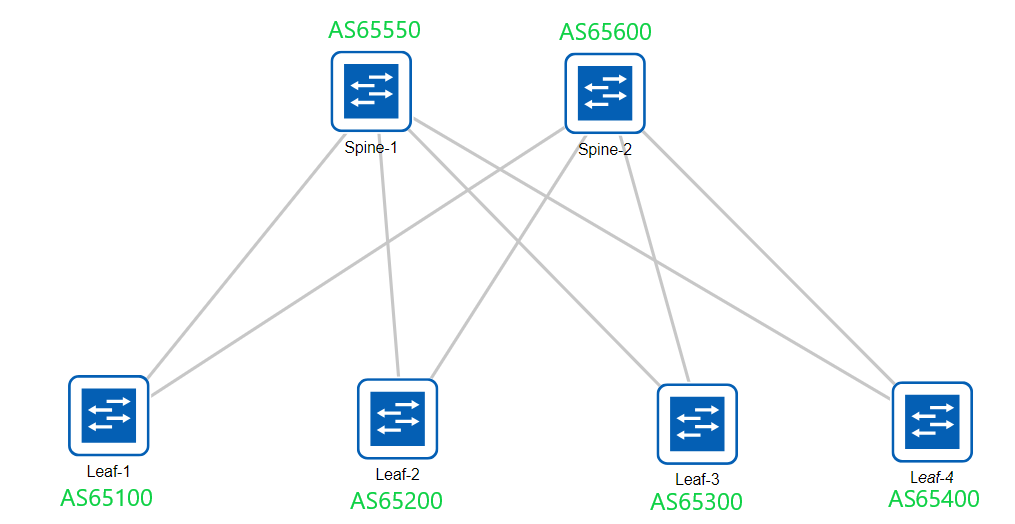
We start with the connections from Spine-1 to all four leaf devices:
set interfaces xe-0/0/0 unit 0 description “to Leaf 1” set interfaces xe-0/0/0 unit 0 family inet address 172.16.1.100/24 set interfaces xe-0/0/2 unit 0 description “to Leaf 2” set interfaces xe-0/0/2 unit 0 family inet address 172.16.3.100/24 set interfaces xe-0/0/4 unit 0 description “to Leaf 3” set interfaces xe-0/0/4 unit 0 family inet address 172.16.5.100/24 set interfaces xe-0/0/6 unit 0 description “to Leaf 4” set interfaces xe-0/0/6 unit 0 family inet address 172.16.7.100/24
You can edit the adress-schema as you like – I personally use the 172.16/16 quite often for my labs and setups, where I need private v4 adresses. Also you should configure lo0-adresses for management and later for identification of your local device:
set interfaces lo0 unit 0 family inet address 172.16.50.1/32
As last part of this step you can already configure your xe/ae-Interface towards your server(s) and equip it with an esi-number:
set interfaces xe-0/0/8 description “to Server” set interfaces xe-0/0/8 ether-options 802.3ad ae0 set interfaces ae0 encapsulation ethernet-bridge set interfaces ae0 esi 00:01:01:01:01:01:01:01:01:01 set interfaces ae0 esi all-active set interfaces ae0 aggregated-ether-options lacp active set interfaces ae0 aggregated-ether-options lacp periodic fast set interfaces ae0 aggregated-ether-options lacp system-id 00:00:00:01:01:01 set interfaces ae0 unit 0 family ethernet-switching vlan members vlan10
Step 2: Create the Underlay
Next, you should define some local system settings for your underlay network:
set routing-options router-id 172.16.50.1 set routing-options autonomous-system 65500
Your underlay will be vital for your Overlay – obvious right? But this part can be tricky – especially with route reflectors. In our case, we will make it simple by using plain EBGP. Why EBGP? Because with EBGP you can scale out your EVPN to infinity and beyond 😉 You could, of course, use OSPF for your underlay network but the drawback is scaling – most customers use EVPN because VC, VCF, JunOSFusion and so on do not scale out the way EVPN does it. And when comparing OSPF vs BGP in terms of scale – well – you already know who will win, right? So we start with creating a group called “underlay”. I personally would advise you to use a naming that fits thepurpose. It doesn’t help you to name your underlay group to G884F6S2 or similar because in one to two weeks nobody will remember what you meant with this description. That’s different if you manage a lot of devices (maybe because you are a systems integrator for your customer) and have a clean documentation:
set protocols bgp group underlay type external set protocols bgp group underlay description “to Spines 1/2” set protocols bgp group underlay export directs set protocols bgp group underlay multipath multiple-as set protocols bgp group underlay neighbor 172.16.3.100 peer-as 65500 set protocols bgp group underlay neighbor 172.16.4.100 peer-as 65600
You should also create a Policy to export your directly connected networks to the underlay so that you have full-mesh connectivity and your loopback-adresses will be redistributed into your BGP underlay:
set policy-options policy-statement directs term 1 from protocol direct set policy-options policy-statement directs term 1 then accept
After doing this on all spines / leafes (of course with different AS-numbers and IP’s) you should have a nice BGP-Fabric.
Time for the next step – the overlay
Step 3: Create the EVPN-VXLAN Overlay
Now it’s time for the funny part – the EVPN-VXLAN overlay. Start by adding an overlay group for your MP-IBGP connection between the leaf devices. Because your iBGP will transport the EVPN-Packets, it’s often referred to as MP-BGP or MP-iBGP (multiprotocol bgp):
set protocols bgp group overlay type internal set protocols bgp group overlay local-address 172.16.20.1 set protocols bgp group overlay family evpn signaling set protocols bgp group overlay local-as 65700 set protocols bgp group overlay multipath set protocols bgp group overlay neighbor 172.16.10.1 set protocols bgp group overlay neighbor 172.16.30.1 set protocols bgp group overlay neighbor 172.16.40.1
Now it’s time for your loopback-address to really shine. Specify the loopback interface as the source address for the VTEP tunnel and also, specify a route distinguisher to uniquely identify routes sent from this device:
set switch-options vtep-source-interface lo0.0 set switch-options route-distinguisher 172.16.20.1:1
Doesn’t look scary if you break it down, right? The key in complex setups is to break the config down to smaller parts. This way, you can solve almost any problem.
Next, you specify the VRF-Import and Export Policy and add your EVPN-Protocol Options regarding VNI’s and the Multicast-Mode: :
set switch-options vrf-import LEAF-IN set switch-options vrf-target target:9999:9999 set protocols evpn vni-options vni 10 vrf-target export target:1:10 set protocols evpn encapsulation vxlan set protocols evpn multicast-mode ingress-replication set protocols evpn extended-vni-list 10
Following up with the VRF import policy to accept EVPN routes advertised from your other leaf devices:
set policy-options policy-statement LEAF-IN term import_leaf_esi from community comm-leaf_esi set policy-options policy-statement LEAF-IN term import_leaf_esi then accept set policy-options policy-statement LEAF-IN term import_vni10 from community com10 set policy-options policy-statement LEAF-IN term import_vni10 then accept
We also set the community targets and configure some load balancing:
set policy-options community com10 members target:1:10 set policy-options community comm-leaf_esi members target:9999:9999 set policy-options policy-statement loadbalance then load-balance per-packet set routing-options forwarding-table export loadbalance
Finally, we define a server facing VLAN (in our example vlan 10) and equip it with a VNI number:
set vlans vlan10 vlan-id 10 set vlans vlan10 vxlan vni 10 set vlans vlan10 vxlan ingress-node-replication
Step 4: Add your Clients and verify the Setup
Congrats – your EVPN is just a commit away. Do it – this part is about what happens “after the BANG”. At this point your EVPN should be up and running – YAY. But what now? How can we check what the EVPN does for us? Lets get to it.
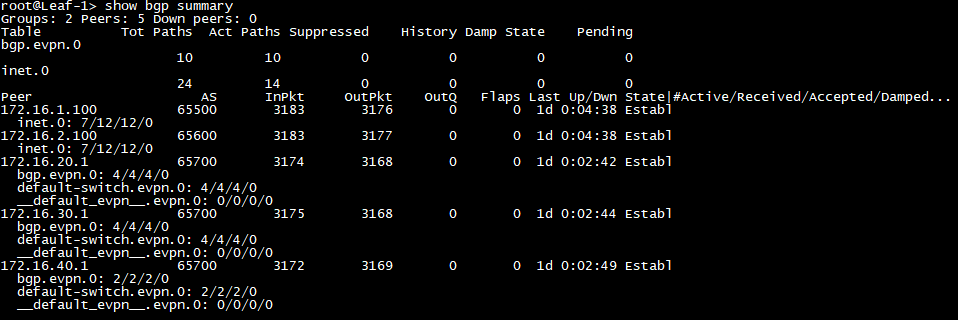
As you can see, in the given Topology, our bgp receives routes from the underlay and also our bgp.evpn gets Infos from our overlay. So far so good. But what about our EVPN-Database?
Sweet – our 2 Hosts are already inside the EVPN-Database and as you can see, one is multihomed and one is single-homed. You can immediately see that because the Active source is different. While the multihomed Server is sourced from an esi (hence the esi-number as source) so basically from multiple leaf devices, the single-homed device is sourced from the leaf device with the loopback address 172.16.40.1 (Leaf-4).
Both of them are also added to each leaf devices local ethernet-switching table. So regardless of the Leaf you connect the Devices to, they will have full Layer-2 reachability across your EVPN-VXLAN – AWESOME! You can simply test this, by pinging from one Device to another 😉
Now imagine each leaf device resides in a different DC or Building – no more do you need to worry about DC stretching – all you need is a solid underlay to build your Infrastructure on. With Contrail, managing your EVPN-VXLAN is even more convenient – but that will be written in a later blog post.
I also tried to add it to JunOS Space, because you can (thanks to EVE-NG) link your Lab to the real world and discover all the devices into your JunOS Space. I was actually impressed, that the vQFX can be added to Space (just discover them with ping only and add snmp later, else the discovery will fail because of the snmp string that is used by the vQFX).
With the “IP Connectivity” however, Space seems to be a bit drunk – but since I only wanted to see if it roughly could manage my EVPN. I would say: Not at this point 😀
Hopefully you now have less fear, when someone mentiones EVPN-VXLAN. And for those who came here just to snag the conig to play with it, here it is 😉
Spine-1:

set version 17.4R1.16
set system host-name Spine-1
set system root-authentication encrypted-password "$6$rB5kPIFJ$91QMtJeCLoVn1o.TN5fPMhQF44MyQXrN0yfMn4Br6lasdBcdyX.XuHE7zYdAC8t4M07icNaSjlusHlVdu4Bxy."
set system root-authentication ssh-rsa "ssh-rsa AAAAB3NzaC1yc2EAAAABIwAAAQEA6NF8iallvQVp22WDkTkyrtvp9eWW6A8YVr+kz4TjGYe7gHzIw+niNltGEFHzD8+v1I2YJ6oXevct1YeS0o9HZyN1Q9qgCgzUFtdOKLv6IedplqoPkcmF0aYet2PkEDo3MlTBckFXPITAMzF8dJSIFo9D8HfdOV0IAdx4O7PtixWKn5y2hMNG0zQPyUecp4pzC6kivAIhyfHilFR61RGL+GPXQ2MWZWFYbAGjyiYJnAmCP3NOTd0jMZEnDkbUvxhMmBYSdETk1rRgm+R4LOzFUGaHqHDLKLX+FIPKcF96hrucXzcWyLbIbEgE98OHlnVYCzRdK8jlqm8tehUc9c9WhQ== vagrant insecure public key"
set system login user vagrant uid 2000
set system login user vagrant class super-user
set system login user vagrant authentication ssh-rsa "ssh-rsa AAAAB3NzaC1yc2EAAAABIwAAAQEA6NF8iallvQVp22WDkTkyrtvp9eWW6A8YVr+kz4TjGYe7gHzIw+niNltGEFHzD8+v1I2YJ6oXevct1YeS0o9HZyN1Q9qgCgzUFtdOKLv6IedplqoPkcmF0aYet2PkEDo3MlTBckFXPITAMzF8dJSIFo9D8HfdOV0IAdx4O7PtixWKn5y2hMNG0zQPyUecp4pzC6kivAIhyfHilFR61RGL+GPXQ2MWZWFYbAGjyiYJnAmCP3NOTd0jMZEnDkbUvxhMmBYSdETk1rRgm+R4LOzFUGaHqHDLKLX+FIPKcF96hrucXzcWyLbIbEgE98OHlnVYCzRdK8jlqm8tehUc9c9WhQ== vagrant insecure public key"
set system services ssh root-login allow
set system services netconf ssh
set system services rest http port 8080
set system services rest enable-explorer
set system syslog user * any emergency
set system syslog file messages any notice
set system syslog file messages authorization info
set system syslog file interactive-commands interactive-commands any
set system extensions providers juniper license-type juniper deployment-scope commercial
set system extensions providers chef license-type juniper deployment-scope commercial
set interfaces xe-0/0/0 unit 0 description "to Leaf 1"
set interfaces xe-0/0/0 unit 0 family inet address 172.16.1.100/24
set interfaces xe-0/0/2 unit 0 description "to Leaf 2"
set interfaces xe-0/0/2 unit 0 family inet address 172.16.3.100/24
set interfaces xe-0/0/4 unit 0 description "to Leaf 3"
set interfaces xe-0/0/4 unit 0 family inet address 172.16.5.100/24
set interfaces xe-0/0/6 unit 0 description "to Leaf 4"
set interfaces xe-0/0/6 unit 0 family inet address 172.16.7.100/24
set interfaces em0 unit 0 family inet dhcp
set interfaces em1 unit 0 family inet address 169.254.0.2/24
set interfaces lo0 unit 0 family inet address 172.16.50.1/32
set forwarding-options storm-control-profiles default all
set routing-options router-id 172.16.50.1
set routing-options autonomous-system 65500
set protocols bgp group underlay type external
set protocols bgp group underlay description "to Leaf 1/2/3/4"
set protocols bgp group underlay export directs
set protocols bgp group underlay multipath multiple-as
set protocols bgp group underlay neighbor 172.16.1.1 peer-as 65100
set protocols bgp group underlay neighbor 172.16.3.1 peer-as 65200
set protocols bgp group underlay neighbor 172.16.5.1 peer-as 65300
set protocols bgp group underlay neighbor 172.16.7.1 peer-as 65400
set protocols igmp-snooping vlan default
set policy-options policy-statement directs term 1 from protocol direct
set policy-options policy-statement directs term 1 then accept
set vlans default vlan-id 1
Spine-2:

set version 17.4R1.16
set system host-name Spine-2
set system root-authentication encrypted-password "$6$rB5kPIFJ$91QMtJeCLoVn1o.TN5fPMhQF44MyQXrN0yfMn4Br6lasdBcdyX.XuHE7zYdAC8t4M07icNaSjlusHlVdu4Bxy."
set system root-authentication ssh-rsa "ssh-rsa AAAAB3NzaC1yc2EAAAABIwAAAQEA6NF8iallvQVp22WDkTkyrtvp9eWW6A8YVr+kz4TjGYe7gHzIw+niNltGEFHzD8+v1I2YJ6oXevct1YeS0o9HZyN1Q9qgCgzUFtdOKLv6IedplqoPkcmF0aYet2PkEDo3MlTBckFXPITAMzF8dJSIFo9D8HfdOV0IAdx4O7PtixWKn5y2hMNG0zQPyUecp4pzC6kivAIhyfHilFR61RGL+GPXQ2MWZWFYbAGjyiYJnAmCP3NOTd0jMZEnDkbUvxhMmBYSdETk1rRgm+R4LOzFUGaHqHDLKLX+FIPKcF96hrucXzcWyLbIbEgE98OHlnVYCzRdK8jlqm8tehUc9c9WhQ== vagrant insecure public key"
set system login user vagrant uid 2000
set system login user vagrant class super-user
set system login user vagrant authentication ssh-rsa "ssh-rsa AAAAB3NzaC1yc2EAAAABIwAAAQEA6NF8iallvQVp22WDkTkyrtvp9eWW6A8YVr+kz4TjGYe7gHzIw+niNltGEFHzD8+v1I2YJ6oXevct1YeS0o9HZyN1Q9qgCgzUFtdOKLv6IedplqoPkcmF0aYet2PkEDo3MlTBckFXPITAMzF8dJSIFo9D8HfdOV0IAdx4O7PtixWKn5y2hMNG0zQPyUecp4pzC6kivAIhyfHilFR61RGL+GPXQ2MWZWFYbAGjyiYJnAmCP3NOTd0jMZEnDkbUvxhMmBYSdETk1rRgm+R4LOzFUGaHqHDLKLX+FIPKcF96hrucXzcWyLbIbEgE98OHlnVYCzRdK8jlqm8tehUc9c9WhQ== vagrant insecure public key"
set system services ssh root-login allow
set system services netconf ssh
set system services rest http port 8080
set system services rest enable-explorer
set system syslog user * any emergency
set system syslog file messages any notice
set system syslog file messages authorization info
set system syslog file interactive-commands interactive-commands any
set system extensions providers juniper license-type juniper deployment-scope commercial
set system extensions providers chef license-type juniper deployment-scope commercial
set interfaces xe-0/0/1 unit 0 description "to Leaf 1"
set interfaces xe-0/0/1 unit 0 family inet address 172.16.2.100/24
set interfaces xe-0/0/3 unit 0 description "to Leaf 2"
set interfaces xe-0/0/3 unit 0 family inet address 172.16.4.100/24
set interfaces xe-0/0/5 unit 0 description "to Leaf 3"
set interfaces xe-0/0/5 unit 0 family inet address 172.16.6.100/24
set interfaces xe-0/0/7 unit 0 description "to Leaf 4"
set interfaces xe-0/0/7 unit 0 family inet address 172.16.8.100/24
set interfaces em0 unit 0 family inet dhcp
set interfaces em1 unit 0 family inet address 169.254.0.2/24
set interfaces lo0 unit 0 family inet address 172.16.60.1/32
set forwarding-options storm-control-profiles default all
set routing-options router-id 172.16.60.1
set routing-options autonomous-system 65600
set protocols bgp group underlay type external
set protocols bgp group underlay description "to Leaf 1/2/3/4"
set protocols bgp group underlay export directs
set protocols bgp group underlay multipath multiple-as
set protocols bgp group underlay neighbor 172.16.2.1 peer-as 65100
set protocols bgp group underlay neighbor 172.16.4.1 peer-as 65200
set protocols bgp group underlay neighbor 172.16.6.1 peer-as 65300
set protocols bgp group underlay neighbor 172.16.8.1 peer-as 65400
set protocols igmp-snooping vlan default
set policy-options policy-statement directs term 1 from protocol direct
set policy-options policy-statement directs term 1 then accept
set vlans default vlan-id 1
Leaf-1:

set version 17.4R1.16
set system host-name Leaf-1
set system root-authentication encrypted-password "$6$rB5kPIFJ$91QMtJeCLoVn1o.TN5fPMhQF44MyQXrN0yfMn4Br6lasdBcdyX.XuHE7zYdAC8t4M07icNaSjlusHlVdu4Bxy."
set system root-authentication ssh-rsa "ssh-rsa AAAAB3NzaC1yc2EAAAABIwAAAQEA6NF8iallvQVp22WDkTkyrtvp9eWW6A8YVr+kz4TjGYe7gHzIw+niNltGEFHzD8+v1I2YJ6oXevct1YeS0o9HZyN1Q9qgCgzUFtdOKLv6IedplqoPkcmF0aYet2PkEDo3MlTBckFXPITAMzF8dJSIFo9D8HfdOV0IAdx4O7PtixWKn5y2hMNG0zQPyUecp4pzC6kivAIhyfHilFR61RGL+GPXQ2MWZWFYbAGjyiYJnAmCP3NOTd0jMZEnDkbUvxhMmBYSdETk1rRgm+R4LOzFUGaHqHDLKLX+FIPKcF96hrucXzcWyLbIbEgE98OHlnVYCzRdK8jlqm8tehUc9c9WhQ== vagrant insecure public key"
set system login user vagrant uid 2000
set system login user vagrant class super-user
set system login user vagrant authentication ssh-rsa "ssh-rsa AAAAB3NzaC1yc2EAAAABIwAAAQEA6NF8iallvQVp22WDkTkyrtvp9eWW6A8YVr+kz4TjGYe7gHzIw+niNltGEFHzD8+v1I2YJ6oXevct1YeS0o9HZyN1Q9qgCgzUFtdOKLv6IedplqoPkcmF0aYet2PkEDo3MlTBckFXPITAMzF8dJSIFo9D8HfdOV0IAdx4O7PtixWKn5y2hMNG0zQPyUecp4pzC6kivAIhyfHilFR61RGL+GPXQ2MWZWFYbAGjyiYJnAmCP3NOTd0jMZEnDkbUvxhMmBYSdETk1rRgm+R4LOzFUGaHqHDLKLX+FIPKcF96hrucXzcWyLbIbEgE98OHlnVYCzRdK8jlqm8tehUc9c9WhQ== vagrant insecure public key"
set system services ssh root-login allow
set system services netconf ssh
set system services rest http port 8080
set system services rest enable-explorer
set system syslog user * any emergency
set system syslog file messages any notice
set system syslog file messages authorization info
set system syslog file interactive-commands interactive-commands any
set system extensions providers juniper license-type juniper deployment-scope commercial
set system extensions providers chef license-type juniper deployment-scope commercial
set interfaces xe-0/0/0 unit 0 description "to Spine 1"
set interfaces xe-0/0/0 unit 0 family inet address 172.16.1.1/24
set interfaces xe-0/0/1 unit 0 description "to Spine 2"
set interfaces xe-0/0/1 unit 0 family inet address 172.16.2.1/24
set interfaces em0 unit 0 family inet dhcp
set interfaces em1 unit 0 family inet address 169.254.0.2/24
set interfaces lo0 unit 0 family inet address 172.16.10.1/32
set forwarding-options storm-control-profiles default all
set routing-options router-id 172.16.10.1
set routing-options autonomous-system 65100
set routing-options forwarding-table export loadbalance
set protocols bgp group underlay type external
set protocols bgp group underlay description "to Spine 1/2"
set protocols bgp group underlay export directs
set protocols bgp group underlay multipath multiple-as
set protocols bgp group underlay neighbor 172.16.1.100 peer-as 65500
set protocols bgp group underlay neighbor 172.16.2.100 peer-as 65600
set protocols bgp group overlay type internal
set protocols bgp group overlay local-address 172.16.10.1
set protocols bgp group overlay family evpn signaling
set protocols bgp group overlay local-as 65700
set protocols bgp group overlay multipath
set protocols bgp group overlay neighbor 172.16.20.1
set protocols bgp group overlay neighbor 172.16.30.1
set protocols bgp group overlay neighbor 172.16.40.1
set protocols evpn vni-options vni 10 vrf-target export target:1:10
set protocols evpn encapsulation vxlan
set protocols evpn multicast-mode ingress-replication
set protocols evpn extended-vni-list 10
set protocols igmp-snooping vlan default
set policy-options policy-statement LEAF-IN term import_leaf_esi from community comm-leaf_esi
set policy-options policy-statement LEAF-IN term import_leaf_esi then accept
set policy-options policy-statement LEAF-IN term import_vni10 from community com10
set policy-options policy-statement LEAF-IN term import_vni10 then accept
set policy-options policy-statement directs term 1 from protocol direct
set policy-options policy-statement directs term 1 then accept
set policy-options policy-statement loadbalance then load-balance per-packet
set policy-options community com10 members target:1:10
set policy-options community comm-leaf_esi members target:9999:9999
set switch-options vtep-source-interface lo0.0
set switch-options route-distinguisher 172.16.10.1:1
set switch-options vrf-import LEAF-IN
set switch-options vrf-target target:9999:9999
set vlans default vlan-id 1
set vlans vlan10 vlan-id 10
set vlans vlan10 vxlan vni 10
set vlans vlan10 vxlan ingress-node-replication
Leaf-2:

set version 17.4R1.16
set system host-name Leaf-2
set system root-authentication encrypted-password "$6$rB5kPIFJ$91QMtJeCLoVn1o.TN5fPMhQF44MyQXrN0yfMn4Br6lasdBcdyX.XuHE7zYdAC8t4M07icNaSjlusHlVdu4Bxy."
set system root-authentication ssh-rsa "ssh-rsa AAAAB3NzaC1yc2EAAAABIwAAAQEA6NF8iallvQVp22WDkTkyrtvp9eWW6A8YVr+kz4TjGYe7gHzIw+niNltGEFHzD8+v1I2YJ6oXevct1YeS0o9HZyN1Q9qgCgzUFtdOKLv6IedplqoPkcmF0aYet2PkEDo3MlTBckFXPITAMzF8dJSIFo9D8HfdOV0IAdx4O7PtixWKn5y2hMNG0zQPyUecp4pzC6kivAIhyfHilFR61RGL+GPXQ2MWZWFYbAGjyiYJnAmCP3NOTd0jMZEnDkbUvxhMmBYSdETk1rRgm+R4LOzFUGaHqHDLKLX+FIPKcF96hrucXzcWyLbIbEgE98OHlnVYCzRdK8jlqm8tehUc9c9WhQ== vagrant insecure public key"
set system login user vagrant uid 2000
set system login user vagrant class super-user
set system login user vagrant authentication ssh-rsa "ssh-rsa AAAAB3NzaC1yc2EAAAABIwAAAQEA6NF8iallvQVp22WDkTkyrtvp9eWW6A8YVr+kz4TjGYe7gHzIw+niNltGEFHzD8+v1I2YJ6oXevct1YeS0o9HZyN1Q9qgCgzUFtdOKLv6IedplqoPkcmF0aYet2PkEDo3MlTBckFXPITAMzF8dJSIFo9D8HfdOV0IAdx4O7PtixWKn5y2hMNG0zQPyUecp4pzC6kivAIhyfHilFR61RGL+GPXQ2MWZWFYbAGjyiYJnAmCP3NOTd0jMZEnDkbUvxhMmBYSdETk1rRgm+R4LOzFUGaHqHDLKLX+FIPKcF96hrucXzcWyLbIbEgE98OHlnVYCzRdK8jlqm8tehUc9c9WhQ== vagrant insecure public key"
set system services ssh root-login allow
set system services netconf ssh
set system services rest http port 8080
set system services rest enable-explorer
set system syslog user * any emergency
set system syslog file messages any notice
set system syslog file messages authorization info
set system syslog file interactive-commands interactive-commands any
set system extensions providers juniper license-type juniper deployment-scope commercial
set system extensions providers chef license-type juniper deployment-scope commercial
set chassis aggregated-devices ethernet device-count 1
set interfaces xe-0/0/2 unit 0 description "to Spine 1"
set interfaces xe-0/0/2 unit 0 family inet address 172.16.3.1/24
set interfaces xe-0/0/3 unit 0 description "to Spine 2"
set interfaces xe-0/0/3 unit 0 family inet address 172.16.4.1/24
set interfaces xe-0/0/8 description "to Server"
set interfaces xe-0/0/8 ether-options 802.3ad ae0
set interfaces ae0 encapsulation ethernet-bridge
set interfaces ae0 esi 00:01:01:01:01:01:01:01:01:01
set interfaces ae0 esi all-active
set interfaces ae0 aggregated-ether-options lacp active
set interfaces ae0 aggregated-ether-options lacp periodic fast
set interfaces ae0 aggregated-ether-options lacp system-id 00:00:00:01:01:01
set interfaces ae0 unit 0 family ethernet-switching vlan members vlan10
set interfaces em0 unit 0 family inet dhcp
set interfaces em1 unit 0 family inet address 169.254.0.2/24
set interfaces lo0 unit 0 family inet address 172.16.20.1/32
set forwarding-options storm-control-profiles default all
set routing-options router-id 172.16.20.1
set routing-options autonomous-system 65200
set routing-options forwarding-table export loadbalance
set protocols bgp group underlay type external
set protocols bgp group underlay description "to Spine 1/2"
set protocols bgp group underlay export directs
set protocols bgp group underlay multipath multiple-as
set protocols bgp group underlay neighbor 172.16.3.100 peer-as 65500
set protocols bgp group underlay neighbor 172.16.4.100 peer-as 65600
set protocols bgp group overlay type internal
set protocols bgp group overlay local-address 172.16.20.1
set protocols bgp group overlay family evpn signaling
set protocols bgp group overlay local-as 65700
set protocols bgp group overlay multipath
set protocols bgp group overlay neighbor 172.16.10.1
set protocols bgp group overlay neighbor 172.16.30.1
set protocols bgp group overlay neighbor 172.16.40.1
set protocols evpn vni-options vni 10 vrf-target export target:1:10
set protocols evpn encapsulation vxlan
set protocols evpn multicast-mode ingress-replication
set protocols evpn extended-vni-list 10
set protocols igmp-snooping vlan default
set policy-options policy-statement LEAF-IN term import_leaf_esi from community comm-leaf_esi
set policy-options policy-statement LEAF-IN term import_leaf_esi then accept
set policy-options policy-statement LEAF-IN term import_vni10 from community com10
set policy-options policy-statement LEAF-IN term import_vni10 then accept
set policy-options policy-statement directs term 1 from protocol direct
set policy-options policy-statement directs term 1 then accept
set policy-options policy-statement loadbalance then load-balance per-packet
set policy-options community com10 members target:1:10
set policy-options community comm-leaf_esi members target:9999:9999
set switch-options vtep-source-interface lo0.0
set switch-options route-distinguisher 172.16.20.1:1
set switch-options vrf-import LEAF-IN
set switch-options vrf-target target:9999:9999
set vlans default vlan-id 1
set vlans vlan10 vlan-id 10
set vlans vlan10 vxlan vni 10
set vlans vlan10 vxlan ingress-node-replication
Leaf-3:

set version 17.4R1.16
set system host-name Leaf-3
set system root-authentication encrypted-password "$6$rB5kPIFJ$91QMtJeCLoVn1o.TN5fPMhQF44MyQXrN0yfMn4Br6lasdBcdyX.XuHE7zYdAC8t4M07icNaSjlusHlVdu4Bxy."
set system root-authentication ssh-rsa "ssh-rsa AAAAB3NzaC1yc2EAAAABIwAAAQEA6NF8iallvQVp22WDkTkyrtvp9eWW6A8YVr+kz4TjGYe7gHzIw+niNltGEFHzD8+v1I2YJ6oXevct1YeS0o9HZyN1Q9qgCgzUFtdOKLv6IedplqoPkcmF0aYet2PkEDo3MlTBckFXPITAMzF8dJSIFo9D8HfdOV0IAdx4O7PtixWKn5y2hMNG0zQPyUecp4pzC6kivAIhyfHilFR61RGL+GPXQ2MWZWFYbAGjyiYJnAmCP3NOTd0jMZEnDkbUvxhMmBYSdETk1rRgm+R4LOzFUGaHqHDLKLX+FIPKcF96hrucXzcWyLbIbEgE98OHlnVYCzRdK8jlqm8tehUc9c9WhQ== vagrant insecure public key"
set system login user vagrant uid 2000
set system login user vagrant class super-user
set system login user vagrant authentication ssh-rsa "ssh-rsa AAAAB3NzaC1yc2EAAAABIwAAAQEA6NF8iallvQVp22WDkTkyrtvp9eWW6A8YVr+kz4TjGYe7gHzIw+niNltGEFHzD8+v1I2YJ6oXevct1YeS0o9HZyN1Q9qgCgzUFtdOKLv6IedplqoPkcmF0aYet2PkEDo3MlTBckFXPITAMzF8dJSIFo9D8HfdOV0IAdx4O7PtixWKn5y2hMNG0zQPyUecp4pzC6kivAIhyfHilFR61RGL+GPXQ2MWZWFYbAGjyiYJnAmCP3NOTd0jMZEnDkbUvxhMmBYSdETk1rRgm+R4LOzFUGaHqHDLKLX+FIPKcF96hrucXzcWyLbIbEgE98OHlnVYCzRdK8jlqm8tehUc9c9WhQ== vagrant insecure public key"
set system services ssh root-login allow
set system services netconf ssh
set system services rest http port 8080
set system services rest enable-explorer
set system syslog user * any emergency
set system syslog file messages any notice
set system syslog file messages authorization info
set system syslog file interactive-commands interactive-commands any
set system extensions providers juniper license-type juniper deployment-scope commercial
set system extensions providers chef license-type juniper deployment-scope commercial
set chassis aggregated-devices ethernet device-count 1
set interfaces xe-0/0/4 unit 0 description "to Spine 1"
set interfaces xe-0/0/4 unit 0 family inet address 172.16.5.1/24
set interfaces xe-0/0/5 unit 0 description "to Spine 2"
set interfaces xe-0/0/5 unit 0 family inet address 172.16.6.1/24
set interfaces xe-0/0/9 description "to Server"
set interfaces xe-0/0/9 ether-options 802.3ad ae0
set interfaces ae0 encapsulation ethernet-bridge
set interfaces ae0 esi 00:01:01:01:01:01:01:01:01:01
set interfaces ae0 esi all-active
set interfaces ae0 aggregated-ether-options lacp active
set interfaces ae0 aggregated-ether-options lacp periodic fast
set interfaces ae0 aggregated-ether-options lacp system-id 00:00:00:01:01:01
set interfaces ae0 unit 0 family ethernet-switching vlan members vlan10
set interfaces em0 unit 0 family inet dhcp
set interfaces em1 unit 0 family inet address 169.254.0.2/24
set interfaces lo0 unit 0 family inet address 172.16.30.1/32
set forwarding-options storm-control-profiles default all
set routing-options router-id 172.16.30.1
set routing-options autonomous-system 65300
set routing-options forwarding-table export loadbalance
set protocols bgp group underlay type external
set protocols bgp group underlay description "to Spine 1/2"
set protocols bgp group underlay export directs
set protocols bgp group underlay multipath multiple-as
set protocols bgp group underlay neighbor 172.16.5.100 peer-as 65500
set protocols bgp group underlay neighbor 172.16.6.100 peer-as 65600
set protocols bgp group overlay type internal
set protocols bgp group overlay local-address 172.16.30.1
set protocols bgp group overlay family evpn signaling
set protocols bgp group overlay local-as 65700
set protocols bgp group overlay multipath
set protocols bgp group overlay neighbor 172.16.10.1
set protocols bgp group overlay neighbor 172.16.20.1
set protocols bgp group overlay neighbor 172.16.40.1
set protocols evpn vni-options vni 10 vrf-target export target:1:10
set protocols evpn encapsulation vxlan
set protocols evpn multicast-mode ingress-replication
set protocols evpn extended-vni-list 10
set protocols igmp-snooping vlan default
set policy-options policy-statement LEAF-IN term import_leaf_esi from community comm-leaf_esi
set policy-options policy-statement LEAF-IN term import_leaf_esi then accept
set policy-options policy-statement LEAF-IN term import_vni10 from community com10
set policy-options policy-statement LEAF-IN term import_vni10 then accept
set policy-options policy-statement directs term 1 from protocol direct
set policy-options policy-statement directs term 1 then accept
set policy-options policy-statement loadbalance then load-balance per-packet
set policy-options community com10 members target:1:10
set policy-options community comm-leaf_esi members target:9999:9999
set switch-options vtep-source-interface lo0.0
set switch-options route-distinguisher 172.16.30.1:1
set switch-options vrf-import LEAF-IN
set switch-options vrf-target target:9999:9999
set vlans default vlan-id 1
set vlans vlan10 vlan-id 10
set vlans vlan10 vxlan vni 10
set vlans vlan10 vxlan ingress-node-replication
Leaf-4:

set version 17.4R1.16
set system host-name Leaf-4
set system root-authentication encrypted-password "$6$rB5kPIFJ$91QMtJeCLoVn1o.TN5fPMhQF44MyQXrN0yfMn4Br6lasdBcdyX.XuHE7zYdAC8t4M07icNaSjlusHlVdu4Bxy."
set system root-authentication ssh-rsa "ssh-rsa AAAAB3NzaC1yc2EAAAABIwAAAQEA6NF8iallvQVp22WDkTkyrtvp9eWW6A8YVr+kz4TjGYe7gHzIw+niNltGEFHzD8+v1I2YJ6oXevct1YeS0o9HZyN1Q9qgCgzUFtdOKLv6IedplqoPkcmF0aYet2PkEDo3MlTBckFXPITAMzF8dJSIFo9D8HfdOV0IAdx4O7PtixWKn5y2hMNG0zQPyUecp4pzC6kivAIhyfHilFR61RGL+GPXQ2MWZWFYbAGjyiYJnAmCP3NOTd0jMZEnDkbUvxhMmBYSdETk1rRgm+R4LOzFUGaHqHDLKLX+FIPKcF96hrucXzcWyLbIbEgE98OHlnVYCzRdK8jlqm8tehUc9c9WhQ== vagrant insecure public key"
set system login user vagrant uid 2000
set system login user vagrant class super-user
set system login user vagrant authentication ssh-rsa "ssh-rsa AAAAB3NzaC1yc2EAAAABIwAAAQEA6NF8iallvQVp22WDkTkyrtvp9eWW6A8YVr+kz4TjGYe7gHzIw+niNltGEFHzD8+v1I2YJ6oXevct1YeS0o9HZyN1Q9qgCgzUFtdOKLv6IedplqoPkcmF0aYet2PkEDo3MlTBckFXPITAMzF8dJSIFo9D8HfdOV0IAdx4O7PtixWKn5y2hMNG0zQPyUecp4pzC6kivAIhyfHilFR61RGL+GPXQ2MWZWFYbAGjyiYJnAmCP3NOTd0jMZEnDkbUvxhMmBYSdETk1rRgm+R4LOzFUGaHqHDLKLX+FIPKcF96hrucXzcWyLbIbEgE98OHlnVYCzRdK8jlqm8tehUc9c9WhQ== vagrant insecure public key"
set system services ssh root-login allow
set system services netconf ssh
set system services rest http port 8080
set system services rest enable-explorer
set system syslog user * any emergency
set system syslog file messages any notice
set system syslog file messages authorization info
set system syslog file interactive-commands interactive-commands any
set system extensions providers juniper license-type juniper deployment-scope commercial
set system extensions providers chef license-type juniper deployment-scope commercial
set interfaces xe-0/0/6 unit 0 description "to Spine 1"
set interfaces xe-0/0/6 unit 0 family inet address 172.16.7.1/24
set interfaces xe-0/0/7 unit 0 description "to Spine 2"
set interfaces xe-0/0/7 unit 0 family inet address 172.16.8.1/24
set interfaces xe-0/0/9 description "to Client"
set interfaces xe-0/0/9 encapsulation ethernet-bridge
set interfaces xe-0/0/9 unit 0 family ethernet-switching vlan members vlan10
set interfaces em0 unit 0 family inet dhcp
set interfaces em1 unit 0 family inet address 169.254.0.2/24
set interfaces lo0 unit 0 family inet address 172.16.40.1/32
set forwarding-options storm-control-profiles default all
set routing-options router-id 172.16.40.1
set routing-options autonomous-system 65400
set routing-options forwarding-table export loadbalance
set protocols bgp group underlay type external
set protocols bgp group underlay description "to Spine 1/2"
set protocols bgp group underlay export directs
set protocols bgp group underlay multipath multiple-as
set protocols bgp group underlay neighbor 172.16.7.100 peer-as 65500
set protocols bgp group underlay neighbor 172.16.8.100 peer-as 65600
set protocols bgp group overlay type internal
set protocols bgp group overlay local-address 172.16.40.1
set protocols bgp group overlay family evpn signaling
set protocols bgp group overlay local-as 65700
set protocols bgp group overlay multipath
set protocols bgp group overlay neighbor 172.16.10.1
set protocols bgp group overlay neighbor 172.16.20.1
set protocols bgp group overlay neighbor 172.16.30.1
set protocols evpn vni-options vni 10 vrf-target export target:1:10
set protocols evpn encapsulation vxlan
set protocols evpn multicast-mode ingress-replication
set protocols evpn extended-vni-list 10
set protocols igmp-snooping vlan default
set policy-options policy-statement LEAF-IN term import_leaf_esi from community comm-leaf_esi
set policy-options policy-statement LEAF-IN term import_leaf_esi then accept
set policy-options policy-statement LEAF-IN term import_vni10 from community com10
set policy-options policy-statement LEAF-IN term import_vni10 then accept
set policy-options policy-statement directs term 1 from protocol direct
set policy-options policy-statement directs term 1 then accept
set policy-options policy-statement loadbalance then load-balance per-packet
set policy-options community com10 members target:1:10
set policy-options community comm-leaf_esi members target:9999:9999
set switch-options vtep-source-interface lo0.0
set switch-options route-distinguisher 172.16.40.1:1
set switch-options vrf-import LEAF-IN
set switch-options vrf-target target:9999:9999
set vlans default vlan-id 1
set vlans vlan10 vlan-id 10
set vlans vlan10 vxlan vni 10
set vlans vlan10 vxlan ingress-node-replication
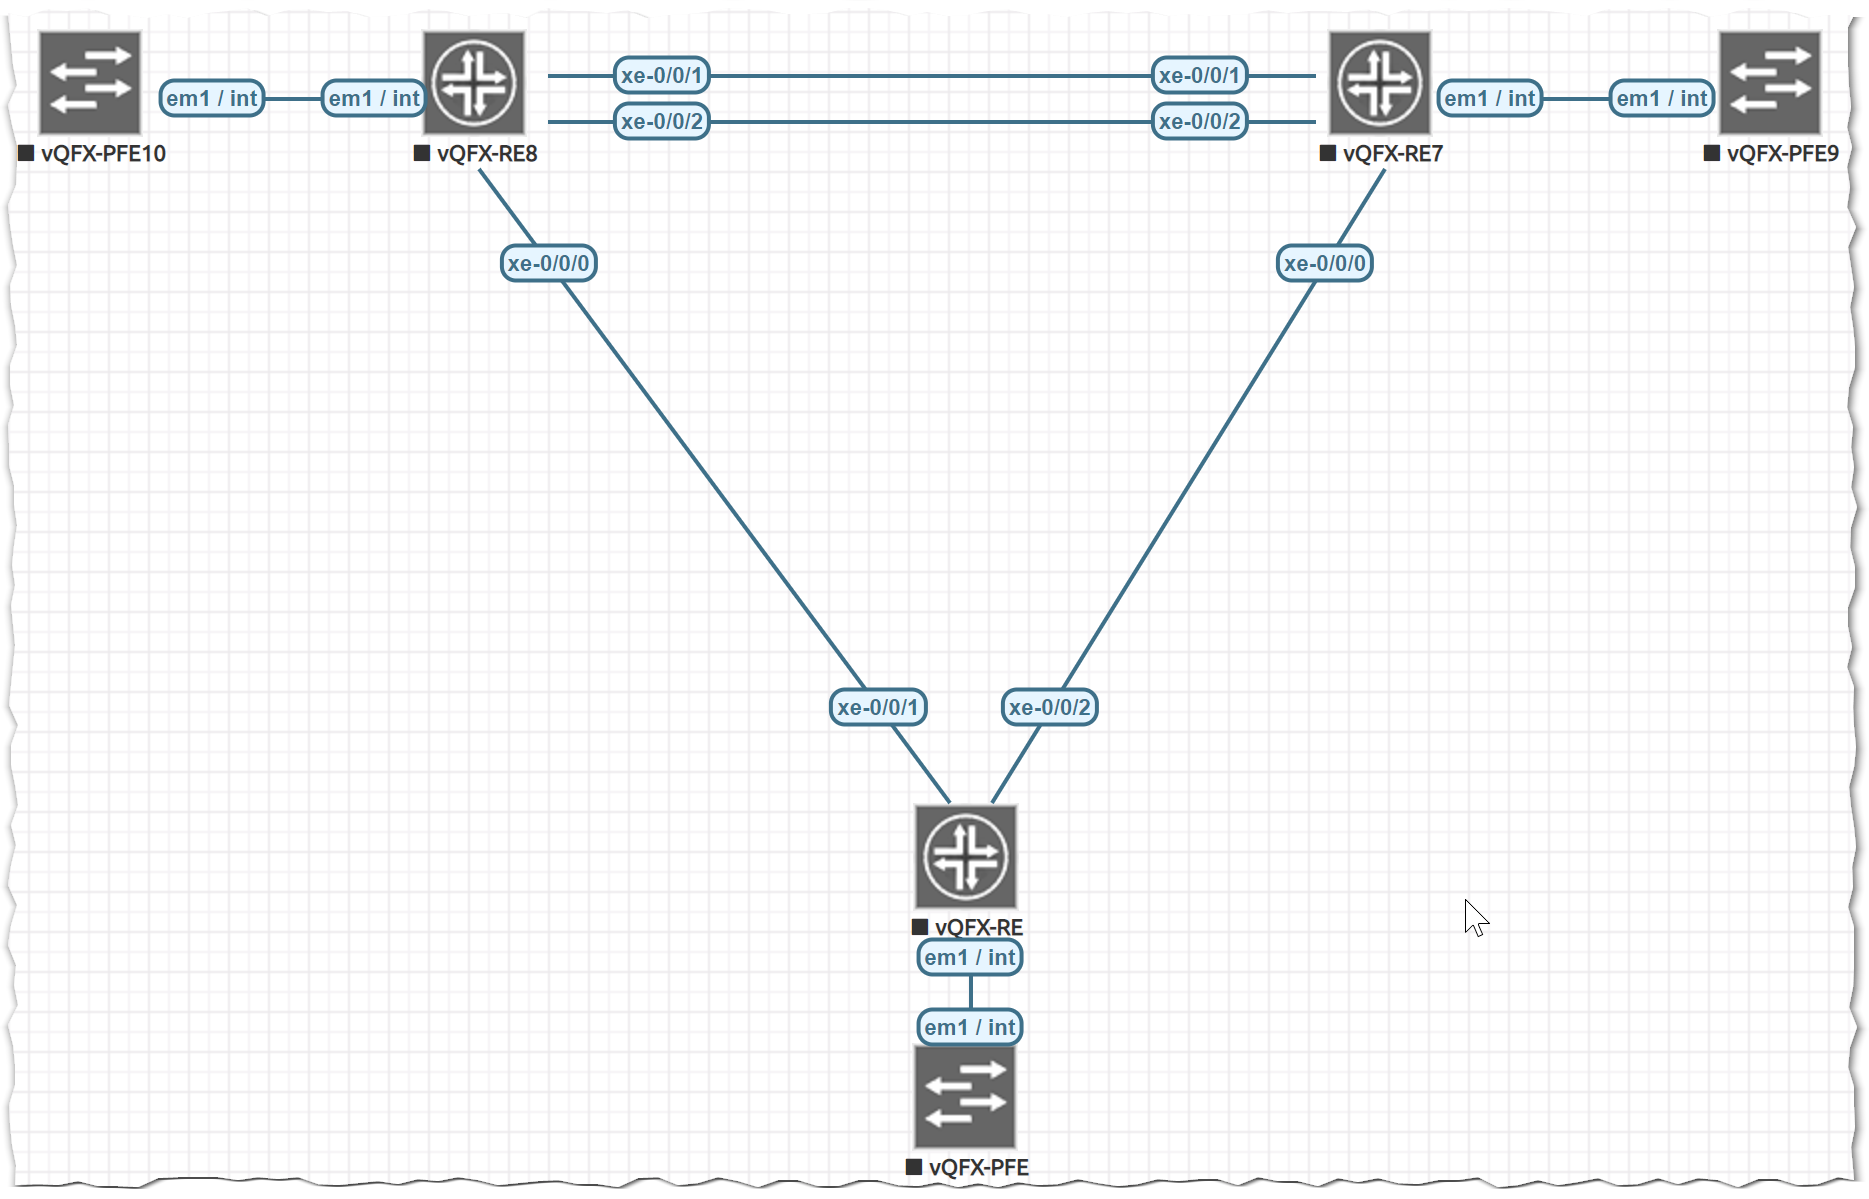
today I’m gonna show you how to implement MC-LAG on the vQFX (QFX10k codebase) on EVE-NG. I personally found this pretty straight forward to configure but since I recieved so many Mails asking me to show this, I will do.
Here’s the very simple Topology (click to enlarge):
And here’s the Code – as you can see it’s not that hard but you have to remember some things:
vQFX-RE7
set chassis aggregated-devices ethernet device-count 2
set interfaces xe-0/0/1 ether-options 802.3ad ae0
set interfaces xe-0/0/2 ether-options 802.3ad ae0
set interfaces xe-0/0/0 ether-options 802.3ad ae1
set interfaces ae0 unit 0 family ethernet-switching interface-mode trunk
set interfaces ae0 unit 0 family ethernet-switching vlan members v500
set interfaces ae1 aggregated-ether-options lacp active
set interfaces ae1 aggregated-ether-options lacp system-id 00:01:01:01:01:01
set interfaces ae1 aggregated-ether-options lacp admin-key 1
set interfaces ae1 aggregated-ether-options mc-ae mc-ae-id 1
set interfaces ae1 aggregated-ether-options mc-ae chassis-id 1
set interfaces ae1 aggregated-ether-options mc-ae mode active-active
set interfaces ae1 aggregated-ether-options mc-ae status-control standby
set interfaces ae1 aggregated-ether-options mc-ae init-delay-time 240
set interfaces ae1 aggregated-ether-options mc-ae redundancy-group 1
set interfaces ae1 unit 0 family ethernet-switching interface-mode trunk
set interfaces ae1 unit 0 family ethernet-switching vlan members v100
set interfaces irb unit 500 family inet address 3.3.3.1/24
set vlans v100 vlan-id 100
set vlans v500 vlan-id 500
set vlans v500 l3-interface irb.500
set protocols iccp local-ip-addr 3.3.3.1
set protocols iccp peer 3.3.3.2 redundancy-group-id-list 1
set protocols iccp peer 3.3.3.2 liveness-detection minimum-receive-interval 9000
set protocols iccp peer 3.3.3.2 liveness-detection transmit-interval minimum-interval 9000
set protocols rstp interface ae0 disable
set protocols rstp interface ae0 mode point-to-point
set protocols rstp interface ae1 edge
set protocols rstp interface ae1 mode point-to-point
set protocols rstp bpdu-block-on-edge
set multi-chassis multi-chassis-protection 3.3.3.2 interface ae0
set switch-options service-id 1


vQFX-RE8:
set chassis aggregated-devices ethernet device-count 2
set interfaces xe-0/0/1 ether-options 802.3ad ae0
set interfaces xe-0/0/2 ether-options 802.3ad ae0
set interfaces xe-0/0/0 ether-options 802.3ad ae1
set interfaces ae0 unit 0 family ethernet-switching interface-mode trunk
set interfaces ae0 unit 0 family ethernet-switching vlan members v500
set interfaces ae1 aggregated-ether-options lacp active
set interfaces ae1 aggregated-ether-options lacp system-id 00:01:01:01:01:01
set interfaces ae1 aggregated-ether-options lacp admin-key 1
set interfaces ae1 aggregated-ether-options mc-ae mc-ae-id 1
set interfaces ae1 aggregated-ether-options mc-ae chassis-id 0
set interfaces ae1 aggregated-ether-options mc-ae mode active-active
set interfaces ae1 aggregated-ether-options mc-ae status-control active
set interfaces ae1 aggregated-ether-options mc-ae init-delay-time 240
set interfaces ae1 aggregated-ether-options mc-ae redundancy-group 1
set interfaces ae1 unit 0 family ethernet-switching interface-mode trunk
set interfaces ae1 unit 0 family ethernet-switching vlan members v100
set interfaces irb unit 500 family inet address 3.3.3.2/24
set interfaces irb unit 500 mac 00:00:00:00:00:05
set vlans v100 vlan-id 100
set vlans v500 vlan-id 500
set vlans v500 l3-interface irb.500
set protocols iccp local-ip-addr 3.3.3.2
set protocols iccp peer 3.3.3.1 redundancy-group-id-list 1
set protocols iccp peer 3.3.3.1 liveness-detection minimum-receive-interval 9000
set protocols iccp peer 3.3.3.1 liveness-detection transmit-interval minimum-interval 9000
set protocols rstp interface ae0 disable
set protocols rstp interface ae0 mode point-to-point
set protocols rstp interface ae1 edge
set protocols rstp interface ae1 mode point-to-point
set protocols rstp bpdu-block-on-edge
set multi-chassis multi-chassis-protection 3.3.3.1 interface ae0
set switch-options service-id 1


Server (in this case shown via vQFX-RE):
set vlans v100 vlan-id 100
set vlans v500 vlan-id 500
set interfaces ae0 unit 0 family ethernet-switching interface-mode trunk
set interfaces ae0 unit 0 family ethernet-switching vlan members v500
set interfaces ae0 unit 0 family ethernet-switching vlan members v100
set chassis aggregated-devices ethernet device-count 1
set interfaces xe-0/0/1 ether-options 802.3ad ae0
set interfaces xe-0/0/2 ether-options 802.3ad ae0
set protocols rstp interface ae0 edge
set protocols rstp interface ae0 mode point-to-point
When configuring MC-LAG always remember that the following settings must match on both Members of the MC-LAG:
LACP System-ID + Key MC-AE ID + Mode VLAN’s (ICL and Member VLAN’s)
The following settings must be unique for each Member of the MC-LAG:
MC-AE Chassis-ID + Status Control ICCP IP (Local) and Peer IP (who would have guessed this…) MC-LAG Protection
I will give you more explanation on this Topic later because as you might have heard my JNCIE-DC is booked for the 14th of February (therefore not so much time to write detailed Blogposts) and time is slowly running away… Okay just kidding – time just took a SPRINT towards my deadline… However, my beard looks fine so far…
Update 15.02.2019: It can happen, that your vQFX-Devices all have the same MAC! Therefore (as a workaround) you can set the irb-mac static on one of the MC-LAG “Core” Devices:
Just 38days of labbing until the JNCIE-DC Exam-Day has arrived. Exam is already booked and I am so excited to do this (way more than with the first JNCIE because I already know what awaits me in terms of the trip to Amsterdam, the Exam-Room etc.) – and I feel way more confident about the Topics (EVPN really kicks ass) 😉
I would love to share some EVE-NG Topos – however, I only work with the official inetZero Superlabs this time and therefore can’t legally share anything.
After the Exam I will try to develop some Training to share for the SEC and DC-Exams to prep you for the final day – in the meantime –> stay tuned 😉
With 2018 slowly fading away, I did a recap of this Year (Certification wise).
2018 was probably my toughest Year yet – but also my most exciting so far. At the beginning of 2018 I switched to Telonic in the middle of my JNCIE-SEC preparation. Regardless of the new Job, I somehow managed to maintain my pace towards this Goal and on the 3rd of July in my 4th Attempt I became JNCIE-SEC #374
When I checked my CertManager I simply could not believe what I managed to do this Year – see for yourself:
Getting a new Certification and maintaining in in daily Business can be challenging – everybody knows that. This Year I managed to get 7 – yes, 7!!!!!! new Certifications and recertified one – HOLY COW… Even if you consider JNCIA-DevOps and JNCIA-Cloud not as “achieved” because they were granted due to the JNCIS-DevOps and JNCIS-Cloud – this was insane… My Goal was to get my first Expert – I got way more than I expected.
Nice to know, that in 2019 I “only” have to defend my JNCIP-ENT and JNCDS-SEC – and my Personal Goal as you know is getting my JNCIE-DC #NoPressure
This pace will be hard to maintain and I’m sure that I won’t be able to do this forever (and luckily I don’t need to) – but the good news is, that I’m still just 29 Years old, always eager to learn new Stuff and if I keep this pace have all 4 Experts before… Nah – I keep this one my personal Secret 😉
Enjoy the time with your family and friends. Looking forward to see all of you in 2019 🙂
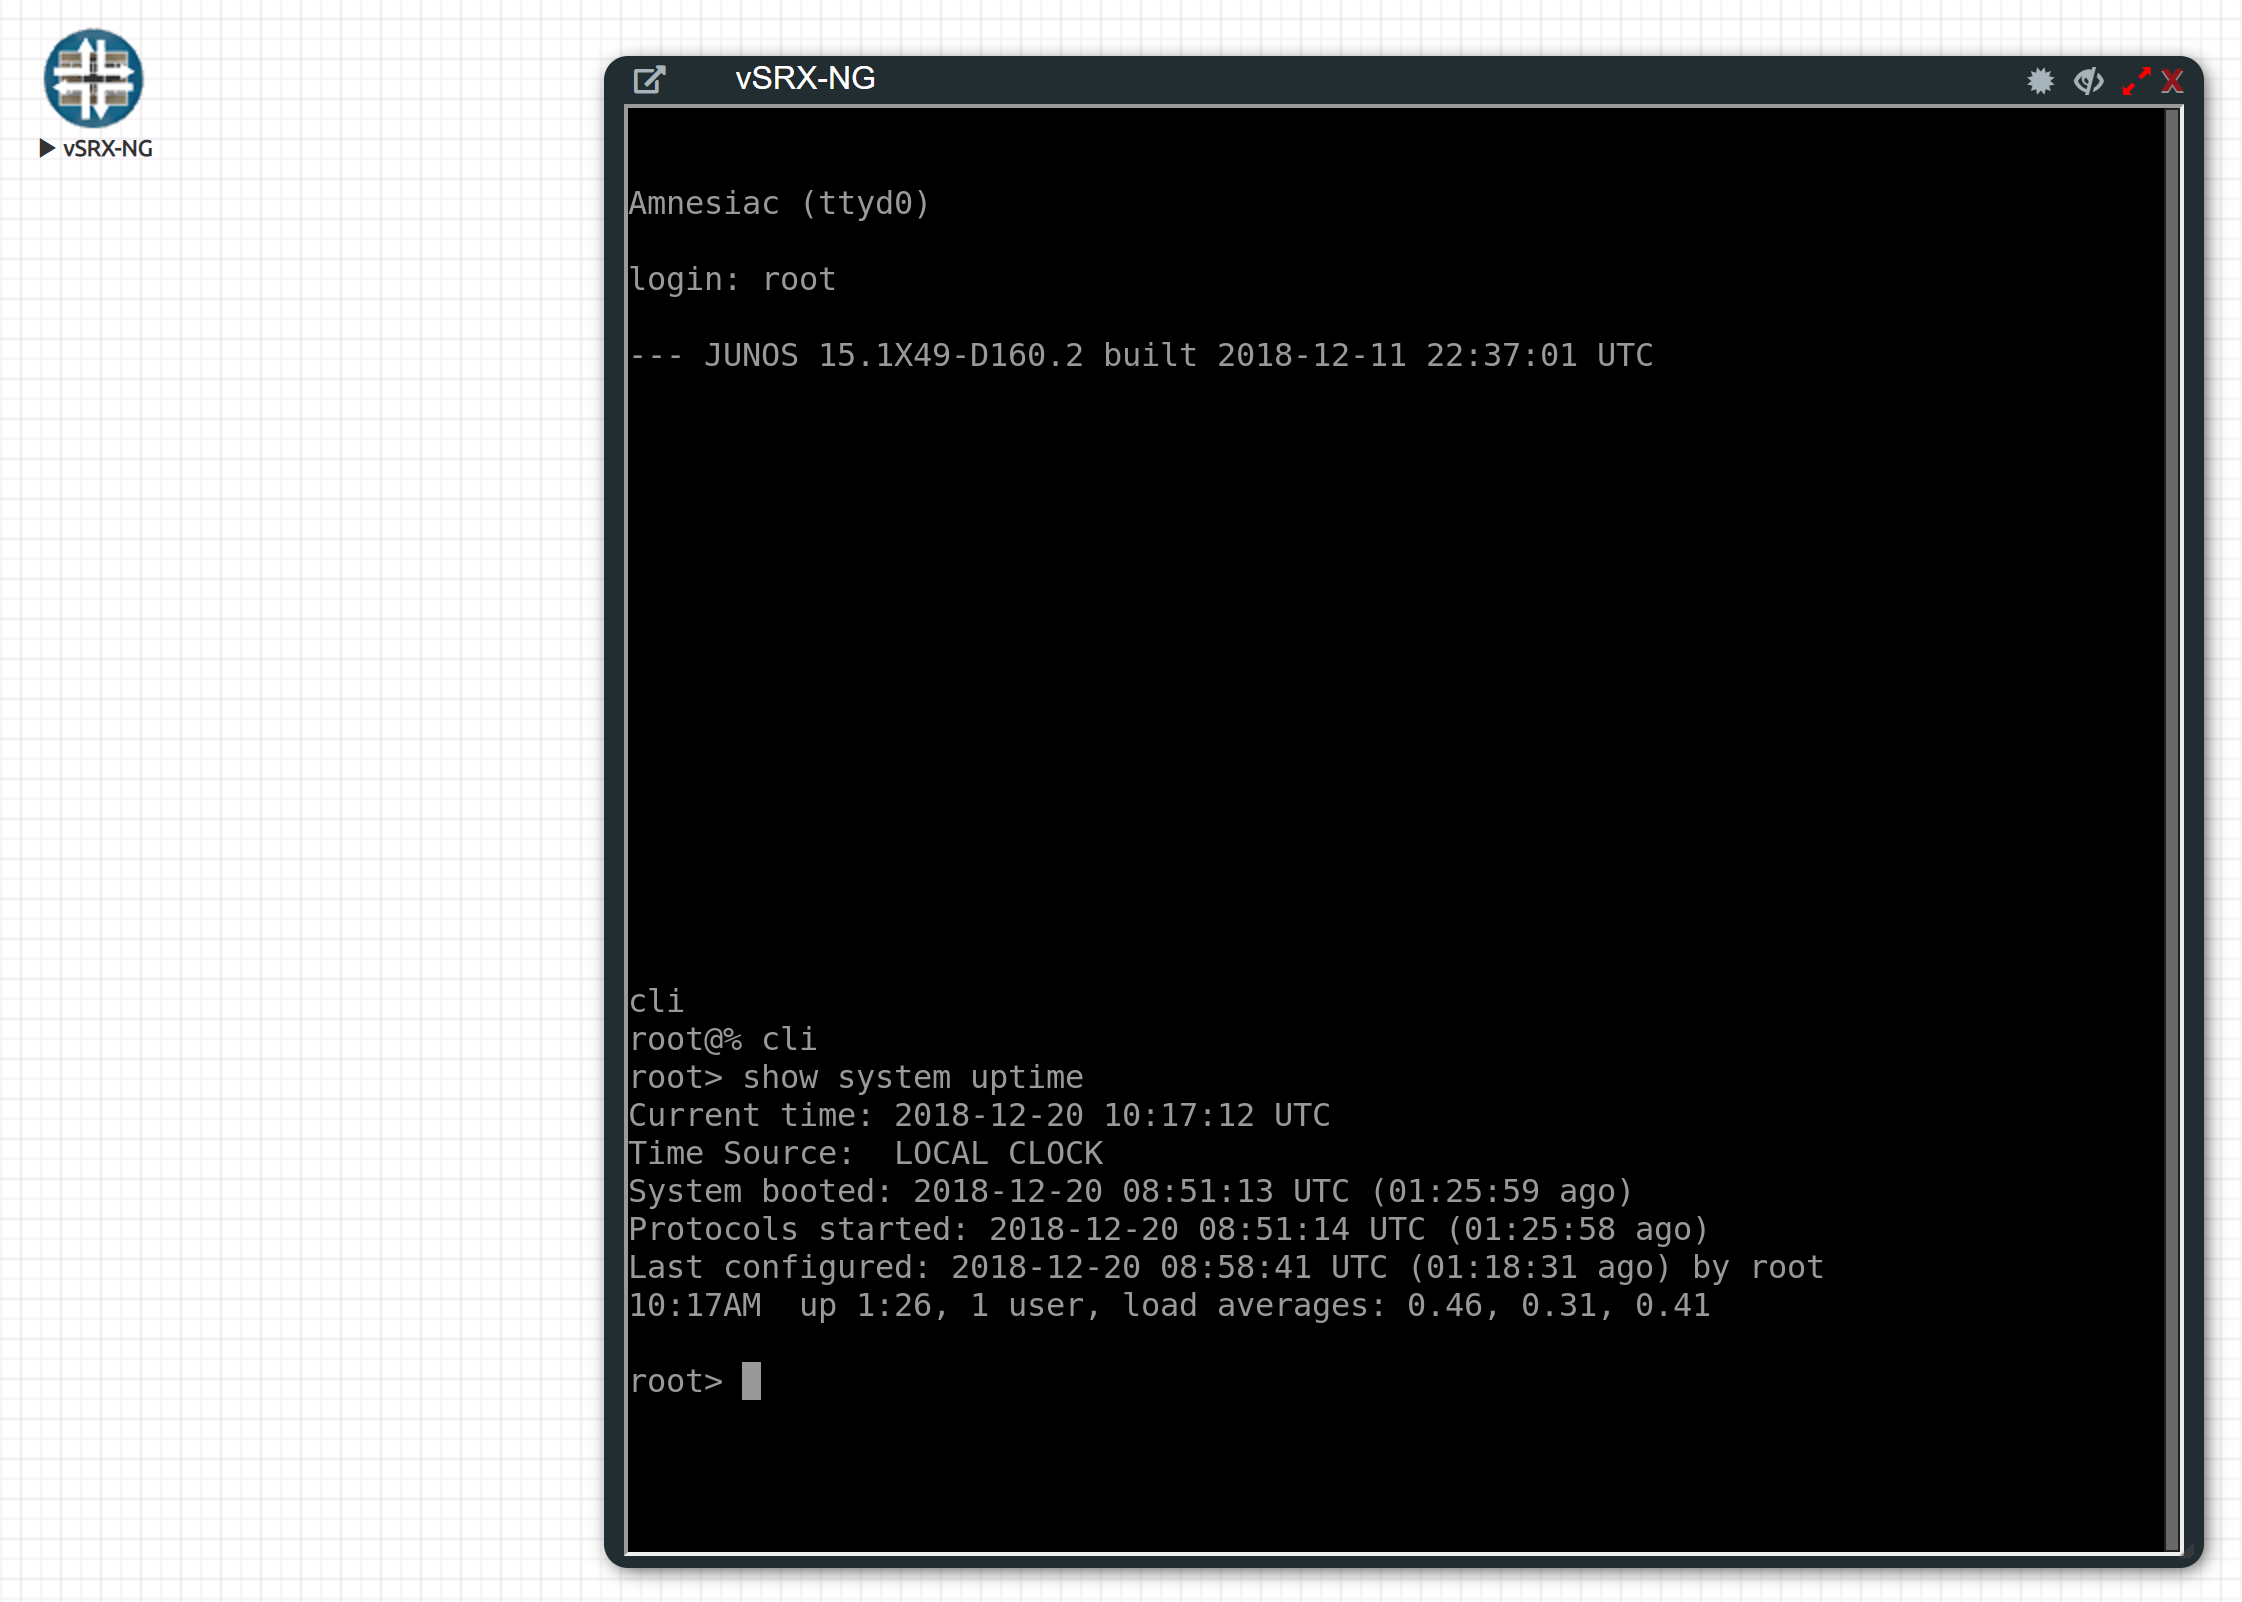
Just FYI – 15.1X49-D160 for the vSRX came out today. Tested with EVE-NG PRO (2.0.4-98) – no issues so far. Happy updating 😉
I use cookies to ensure that I give you the best experience on my Blog. By using this site and the info from this site I assume that you are ok with it. If not that makes me a sad Panda...Of courseGet me outta here...