Yesterday I played with the OpenVPN Settings in my PfSense at home and thought:
Will it be possible to enable IPv6 through my VPN so that I can access my IPv6 only Content even when I’m staying at my parents-in-law where I only have a crappy 1&1 IPv4 DSL?
Turns out: HELL YEAH 😀
This was way easier than I thought, but I thought I share it with you.
This article is based on the following assumptions:
– You already have your OpenVPN running over IPv4
– Your Server has connection over IPv4 and IPv6 (basically, you are dual-homed so that the Server can access the content and serve it to you)
– You have a free /64 Subnet for your clients to use that is routed towards your Server’s GW IP
Start by navigating to VPN –> OpenVPN. Next to the “Server,” hit the Edit button.
You should now see a similar screen to the one below:
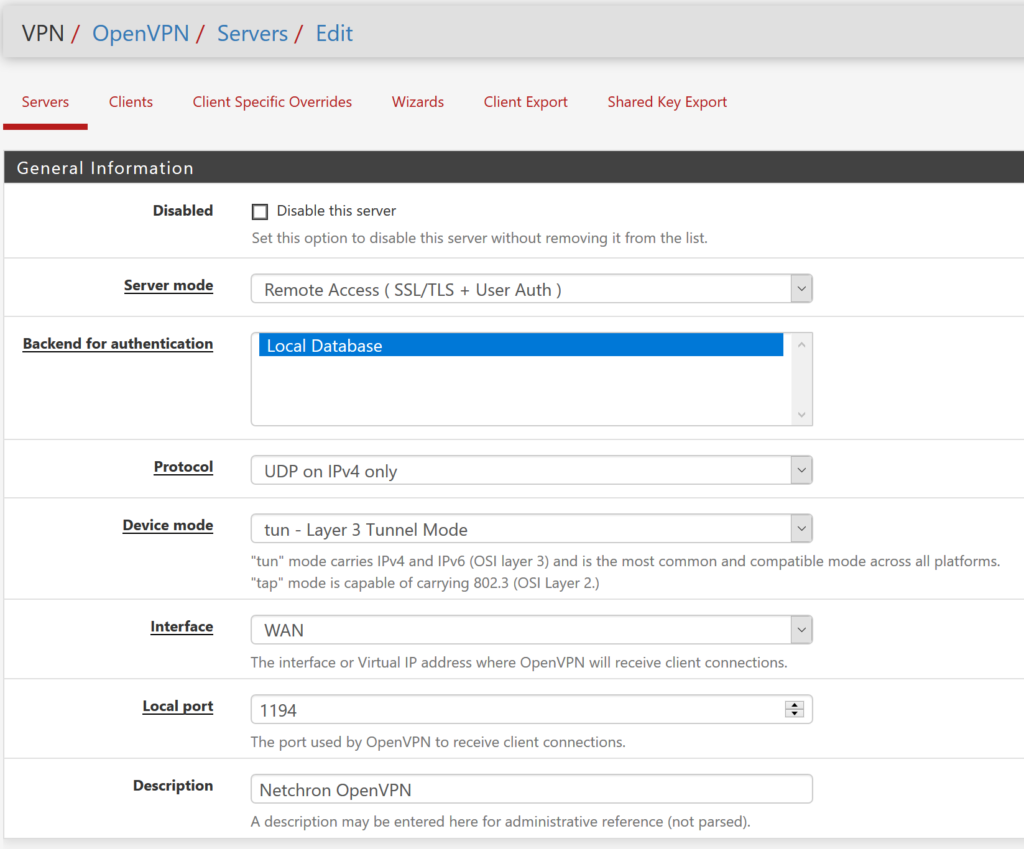
You can leave the Protocol to IPv4 only. I want my Clients to have IPv6 Access everywhere. Enabling the Protocol for both IP-Families does not make sense to me. If I have v6 connectivity already, I can surf away – this only makes sense if you also want to connect via IPv6 in IPv6-only networks but still get your IPv6 Prefix due to ACLs and such.
If you scroll down, you see the IPv6-Tunnel-Network. Insert your /64 prefix in there. PfSense will take care of the Rest for you (DHCPv6, Gateway creation, and so on) so that your clients know how to reach the IPv6 World and get an IPv6 address from your subnet. I also ticked “force all Traffic through the tunnel.” If you don’t check this box, your Client will get an IPv6 Address assigned and will then try to talk IPv6 directly (which will fail in IPv4-only networks obviously) to the resources out there.
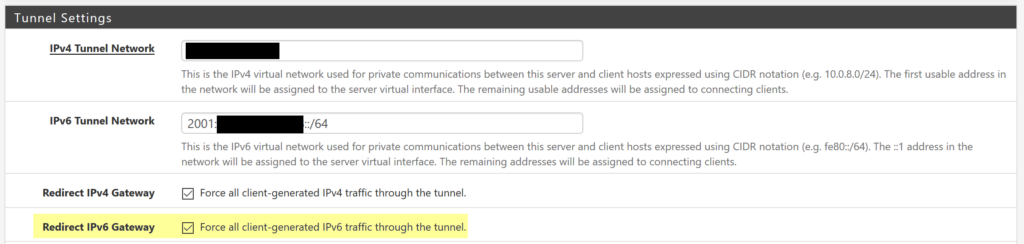
You want to make sure, that your Clients are able to resolve IPv6 FQDN’s so don’t forget to add at least one IPv6 Nameserver IP to your DNS Section of the Settings.

If you scroll down a little further, you will see the “Gateway creation” section. Initially, mine was set to IPv4 only – change this to “Both” so that PfSense automatically creates the Gateways for you. You can do that manually, but why make life harder than it needs to be? IPv6 is straightforward – and we should leave it this way 🙂

Hit the “Safe” Button and that’s basically it.
At least I thought… 😉
Remember: You just enabled IPv6 for your Tunnel, but your Client is still using the old config-file for IPv4 only!
So either go to the “Client Export” Section and download the new config file or add this to your current config:tun-ipv6
I added it just below the IPv4 tun mode so my file begins with:
dev tun<br>tun-ipv6<br>...<br>...<br>...
That’s it. Connect to your Server again and BAM – IPv6 tunneled through IPv4 🙂
Hope this helps you to enjoy IPv6 everywhere!
Thank you for the info. Been trying to enable IPv6 over OpenVPN and couldn’t find anything useful until I found this post. Have it all working great.
Hi Christian,
thanks for this informative post.
I’m struggeling in choosing the correct free free /64 Subnet.
My ISP is giving me a /56 and I use the 1st /64 for may LAN.
Many thanks in advance and kind regards,
Frédéric
Hi Frédéric,
is there a CPE between the pfSense and the ISP-Modem or is the Pf-Sense your CPE?
SOmetimes the routing needs to be adjusted between the Devices before pfSense and it might make sense to use a “transfer” /64 to route your client /64 over to your PF-Sense 🙂