Here are the Demo Slides that I showed at NXTWORK this year (click the Folder to download)
The Video-Series (with Audio) is happening very very soon 🙂 😉

The end of the year is near, and it’s time to reflect a bit about what happened in 2019 in terms of Certification in the Industry of Networking. And there was some shocking, almost ridiculous news this year. Some of you might have heard it – Cisco “Re-Designed” their Certification Track for the CCNA, which will become active in 2020, and they will also introduce a “Cisco Specialist” between the CCNA and CCNP. I wonder whom they try to copy with this “CCNS” 😉 However, they seem to have failed.
How you might ask? Let me explain this a bit. If you look at the new Certification Path it looks like this:
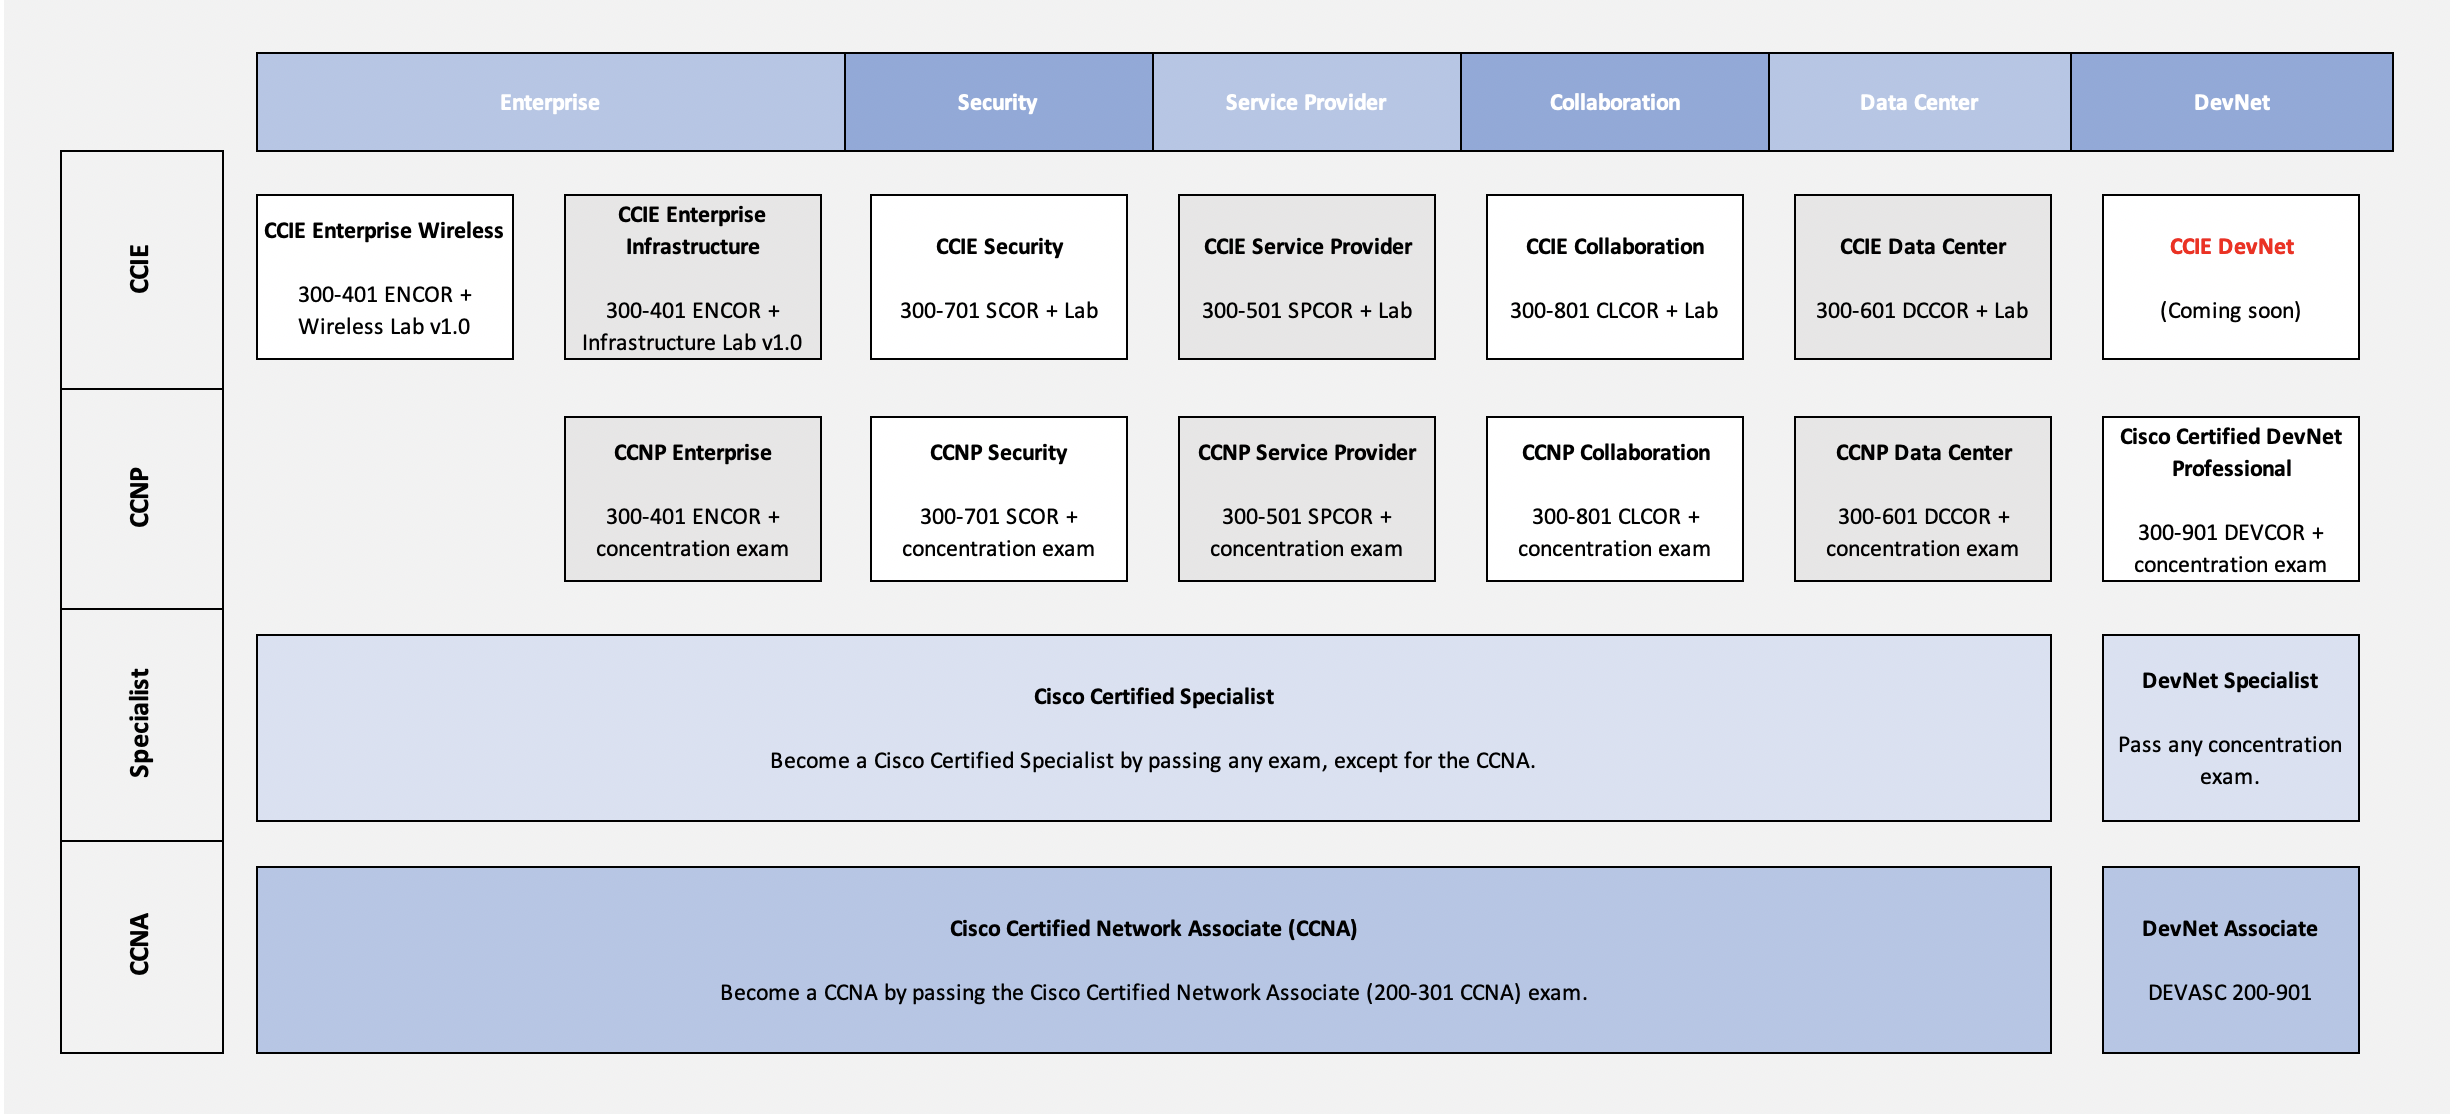
Noticed something? The CCNA and “CCNS” are spanned over ALL the 5 Topics. We live in a world where AI will sooner or later dominate the “Allround-IT-Guys,” and Cisco is trying actively to make new network engineers allrounders… When I heard the news, I was shocked that they seem to forget where they came from and why everyone pursued the CCNA Tracks – because the Tracks started at the very basic in every Topic.
Unfortunately, they seem to have forgotten the benefit of specialization. Specialization is essential and needed because that’s where the difference between “I know the basics” and “I KNOW the Basics in my field” will happen. Who needs an engineer that knows all topics “at the surface” up to the Specialist Level? This is what a good AI can do (and replace) today – I don’t need someone to tell me that OSPF is down, I don’t need someone to tell me that my phone is not working because a VLAN is missing somewhere… And most of all: I don’t care about collaboration if I work inside a SoC with no Telephony or WiFi at all – instead, I want to learn about the Security-specific Topics to build my Security career from the very beginning.
It makes the CCNA “worthless”, in my opinion, and that’s the main reason why I let my CCNA expire earlier this year – because it tells you NOTHING about my actual knowledge inside the area that I work in.
Network Engineers need to take a step back from “I know everything a bit” because allrounders are no longer demanded and needed because we have software for that. Even a monkey can operate such software – we need to make the shift towards “I’m a specialist in my area, and no one can fool me there.”
That’s what Juniper, for example, is aiming at with the introduction of the Career-Tracks at the Associate Level. They start basically where your Career starts without all the possible other areas and technologies. At Cisco, you now need to learn stuff that you will never have to deal with, and that does not give you any benefit at all to get your CCNP with a specialization active – Ridiculous if you ask me. I don’t know about you but my time is way too valuable to learn stuff that I will most likely never use – there are too many other interesting, specialized things to learn about to improve myself.
That’s why in 2020, the CCNA will most likely be “worthless” because putting 5 Tracks into one Exam just for the sake of reducing the exams is just not the right way, in my opinion. I’m curious about your opinion. Do you think that allrounders are better than specialized Staff? What’s your daily experience? Feel free to leave a comment because I’m very, very interested in that.
EVE published the new Pro Version on December 11th. And what a nice Christmas present from the Team 🙂
The Version brings more performance to the Juniper Images (vSRX-NG for Example) and also adds IPv6-Support for the EVE host itself – this is a huge step towards running EVE-NG in IPv6 only environments and puts the EVE Solution on the top considering that most Vendors still struggle with the very basics of IPv6. Currently, EVE in pure v6 is not possible, because the Licensing Servers are not (yet) reachable via v6 – this might change soon which would allow the v6-only Environments to become reality.
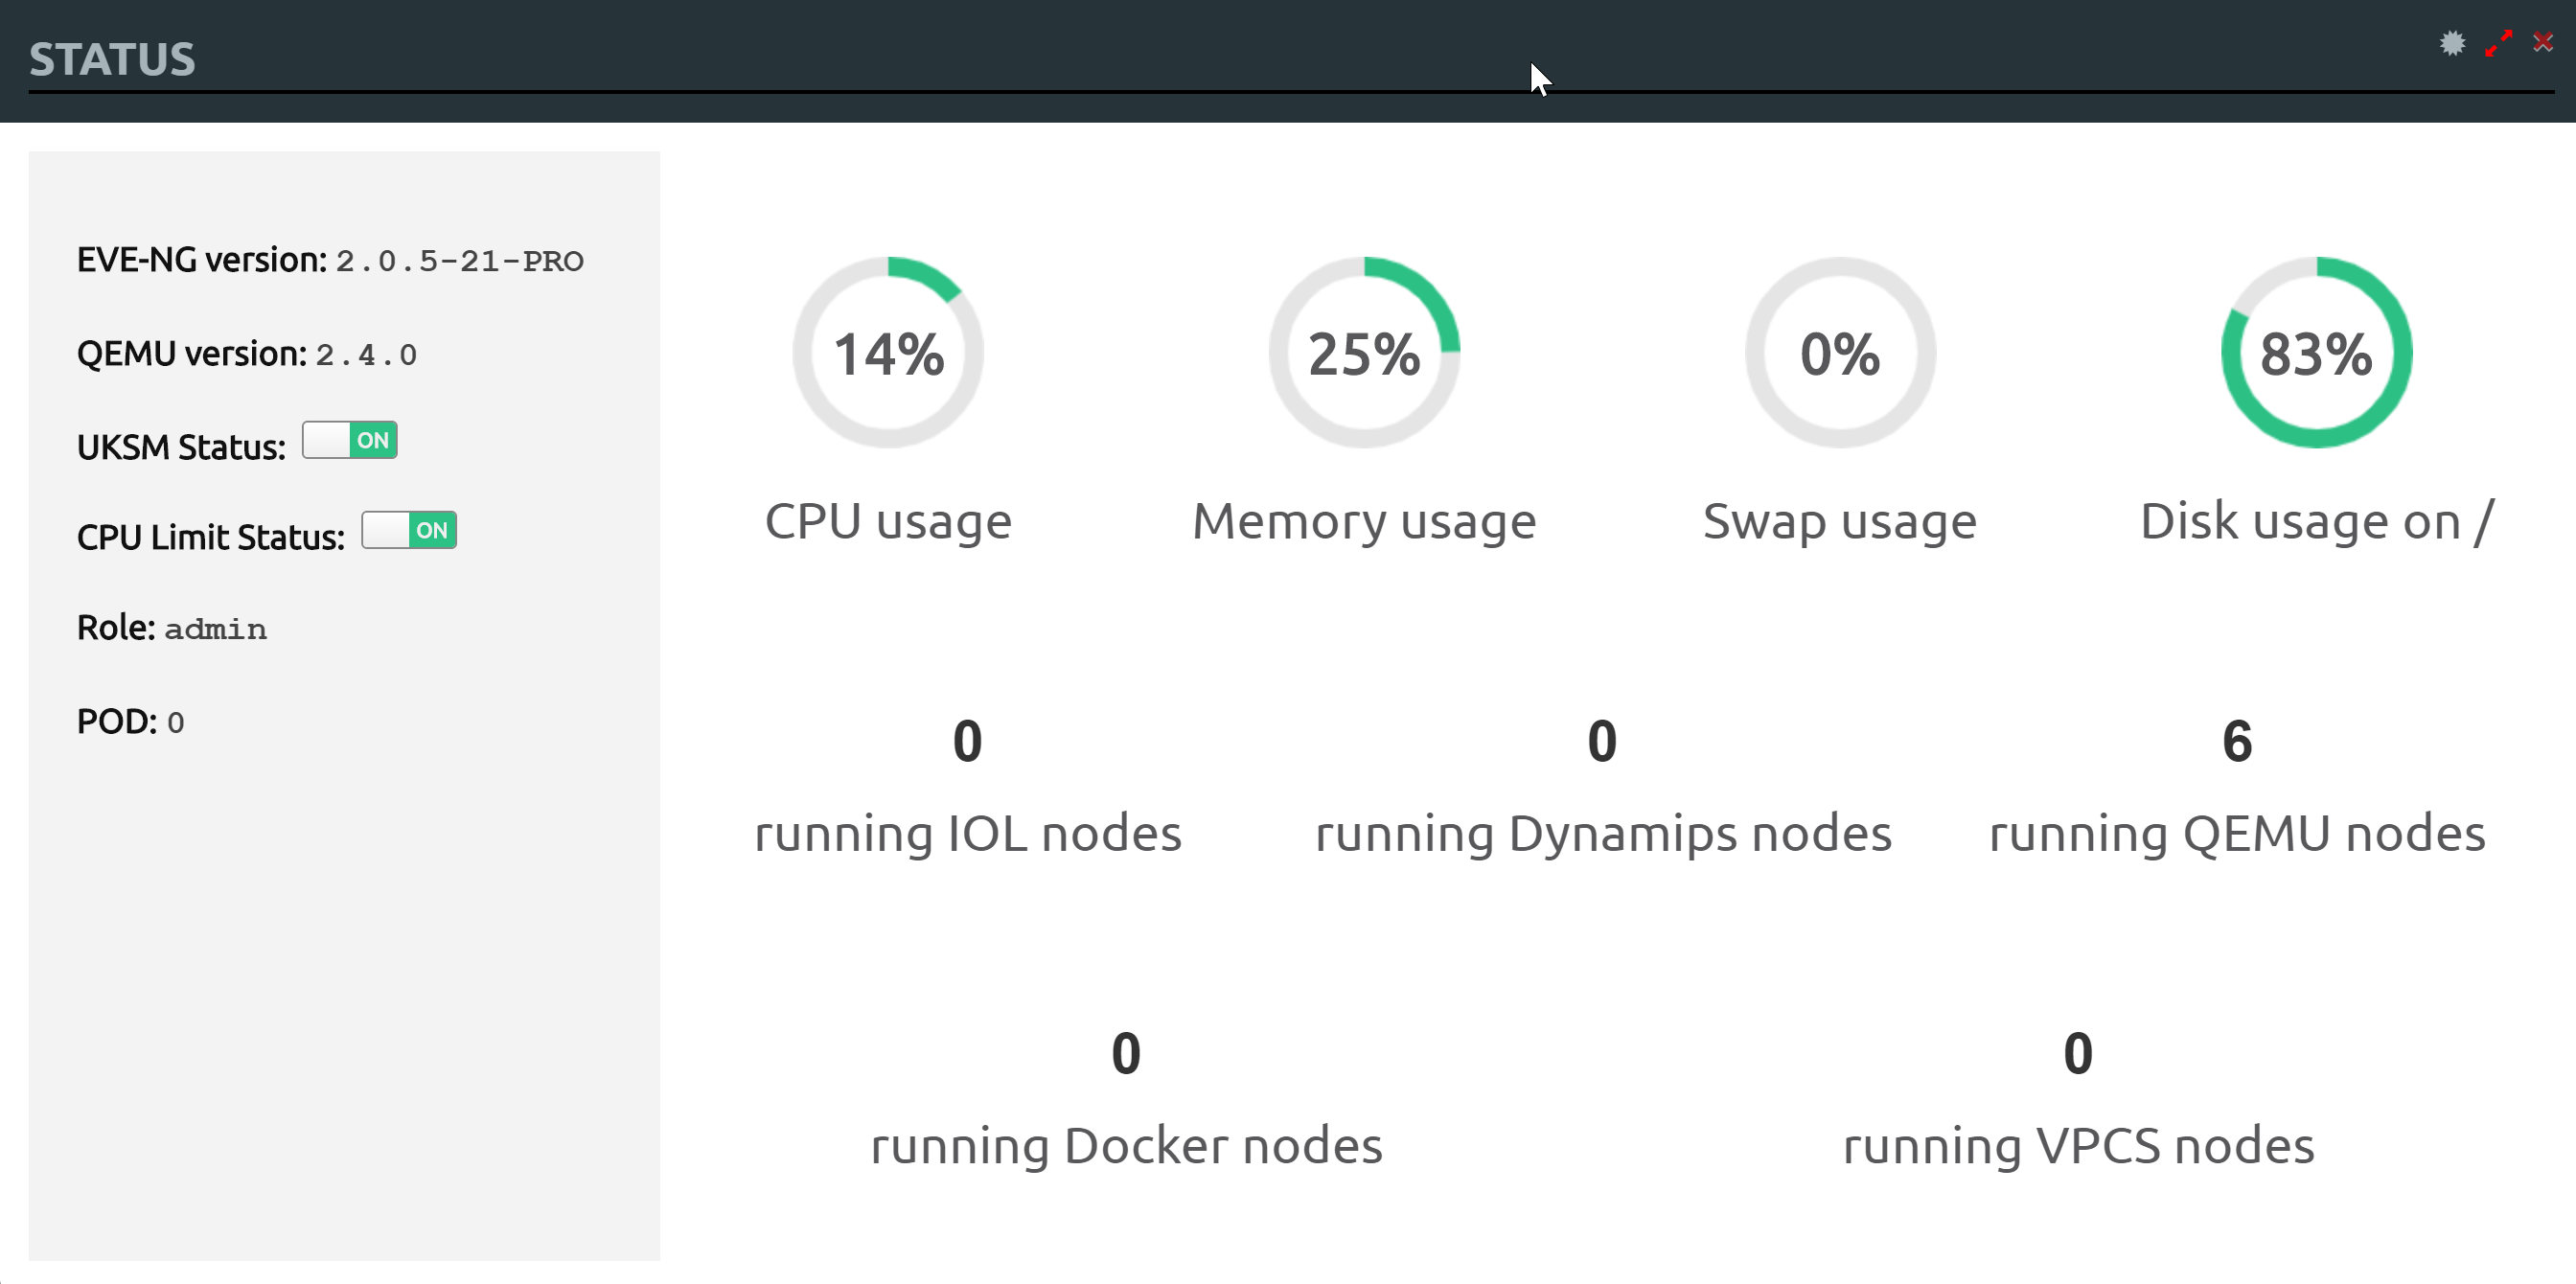
I took the new Version for a Test-Drive and updated my SSD-Server to the new Version. As you know I have my JNCIE-Labs running in there so that’s the perfect opportunity to test this Version on my Large Labs.
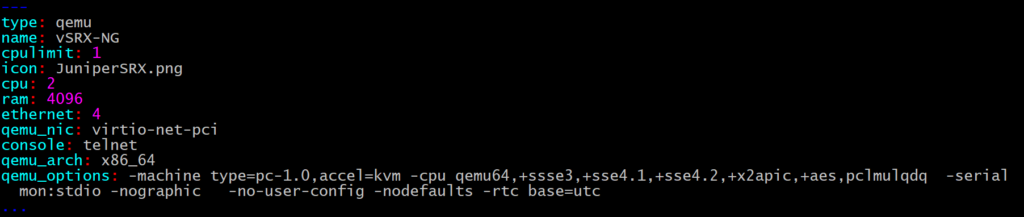
Here you can see the template-difference between 2.0.6-17-PRO (shown first) and 2.0.6-31-PRO (shown second):

My JNCIE-DC Lab took me roughly 30-35mins to fully boot up and have all Devices operational.
The Same Lab rebuilt with the new EVE-Pro took roughly 25-30mins to fully boot up and have all Devices operational – that’s on an SSD-Server with 32vCPU and 120GB of RAM running 39 qemu Devices.
Also, the Devices feel a bit faster compared to the old EVE-NG Versions.
Notice, that only new labs will benefit from the new performance. Your “old” labs will not automatically adjust to the new settings and that’s good because if you change the qemu parameters “hot” your devices might not boot anymore.
Over the next weeks, I will have the ability to Lab even more (thanks to the holidays) – check back from time to time over the holidays for some nice EVE Posts.
Also, I’m still working on the EVE-NG and Juniper Video Course. The Topologies will also be available once the Video Series starts. Since this is a lot of Stuff to do it takes some time – so please be a little more patient 🙂
Hey all,
I wanted to write this post for a looooong time. As you all know I went through the character-forming process of getting my first Expert in 2018 and will try it again in 2020 for Expert #2 and #3 😉
Since this is a very hot Topic I just wanted to give you some advice about the Prepping-Phase and how to “optimize” your Lab experience. This list might help you or not – this strongly depends on your experience so far and how you learn. So this list is just an advice.
+ Stop learning 2-3 days before the Exam
In general, I learned, that it’s not a good idea to learn until the very last second before the Lab – it might only frustrate you. When starting your Journey you can simply open up an Excel-Spreadsheet, write all Topics from the Blueprint down and decide the time that you want to spend on each topic. After that you count the days from today until the day that you might do your first shot, giving yourself some extra time in case you get sick or something. The date, that you now can see is your earliest exam date. Remember: The JNCIE is not a race – it’s a marathon. That’s why I recommend you to just relax a couple of days before the exam because what you think you might learn 2 days before the exam can, in reality, kill your exam because you overthink too much. Don’t make the biggest mistake and even lab the day before the exam. This is a very very very very very bad idea. First of all, you will drive yourself crazy if you run into “hasty” errors that haven’t been there before (because you do a quick lab and forget half the stuff and then be awake all night thinking about this mistake) and second, you might accidentally lab until you realize, that the Clock shows 3 AM and the lab starts at 9 AM… Which brings me to advice 2 on my List:
+ Take a good sleep the night before
Take the day before the exam off – arrive early in the hotel, make yourself familiar with the way to the Juniper-Building, go for a walk, enjoy a great meal and get into bed early to be fresh the next day. This will greatly improve your experience – trust me…
+ Don’t arrive too early
It sounds simple, but this can be a hard mistake. If you are like me and you want to make sure, that you will definitely be on time you might end up planning too much time and end up arriving an hour early. Good because now you can tell yourself for a whole hour how hard this will be, right? WRONG – you will end up in a corner thinking too much, crying (okay maybe just inside) and driving yourself crazy about what will happen… I advise you to arrive between 30min and 15min early to have enough time for the registration but please don’t camp there – it will only make things worse.
+ Don’t eat heavy – less is more
This might sound obvious to you but after 4h of labbing – INTENSE labbing, your stomach will tell you to eat everything you find. The trick is not to listen. Enjoy a light snack and also drink a lot to stay fresh – your brain needs water. Some of you might say that you shouldn’t drink so much because water sooner or later needs to get out again right? Exactly – because I also strongly advise you to step away from the lab every 2 hours for at least 5 minutes to just take a deep breath and therefore drinking a lot of water might help you to motivate you to get away from the screen (even if you don’t want to you have to do it or terrible things will happen in the exam room). Because trust me – no one can mess your lab like yourself…
+ Interview yourself via Voice-Recording
After the Exam, you take a deep breath and head towards your Hotel-Room or drive home (I’m sure you have a Headset). Start recording yourself and Interview yourself. Ask yourself what was easy in the Lab and where you struggled – try to tell yourself how you think you can solve this in the future if you all of a sudden have a clue – the more details you record now, the more helpful you will be to your future self who will sit in the Home-Lab and try to memorize the struggle to avoid it next time. Think about every topic that you saw and tell yourself especially about the parts that weren’t that good. Act quickly – don’t think that you can do this “tomorrow”, because tomorrow you will remember only half the stuff from this intense lab experience.
With this interview from yourself for yourself (remember you are under NDA) you can go through your official Courseware again and lab the topics where you struggled. This helped me a lot – especially because my brain tends to block inside the exam room and releases the “oh that topic? you solve it like this” Information as soon as I step outside of the Building 😉
+ Make Notes after the Lab
This is more or less like the advice with the voice recording: make yourself notes as soon as you can. Our Brain is trained to forget everything that it does not need to survive. Every hour after the lab you will – if you are like me – forget roughly 10 to 15% of the exam. So make yourself notes. What was good? What was bad? What do you need to look at so you are better next time? Where are you unsure about how to solve certain things? All these notes may help you when prepping for the next attempt. I usually take 2 to 3 months between each exam attempt and do very intense labbing in between, especially in the area where I struggled because I want to improve myself not only for the lab but for the reality. And the more notes there are, the better you can prep for the next attempt. Again: NDA – NEVER EVER share this Infos with anyone – seriously!
+ Take a break after the Exam (rest the day after)
The day after the lab, I usually take a day off. I have a late breakfast at the Hotel, drive home and get in touch with friends and family and just enjoy that the Exam is over. The Exam is very stressful and your body will be happy if you have a rest and not get into work the day after the exam. Many employers will give you the day before and after the exam off if you ask them. Most of them already know, how stressful this is and if not – tell them
And in general, no matter if you succeeded or failed – Be proud of yourself. Attending a JNCIE-Exam is not something that you do every day, it requires intense labbing and learning and you should celebrate your achievement. These Notes are just my personal “lessons learned” – they might or might not work for you. See this as tips to consider for the JNCIE.
And some personal Note: Even if you did not succeed for 2 or 3 times – stay focused, don’t give up and pursue your goal – it’s totally worth it. I would really love to hear about your experience – feel free to write me a Mail or leave a comment 🙂
As part of my JNCIE-ENT study, GRE-Tunnels are also a topic.
Turns out, that GRE-Tunnels are quite simple to set up and give you a lot of Flexibility.

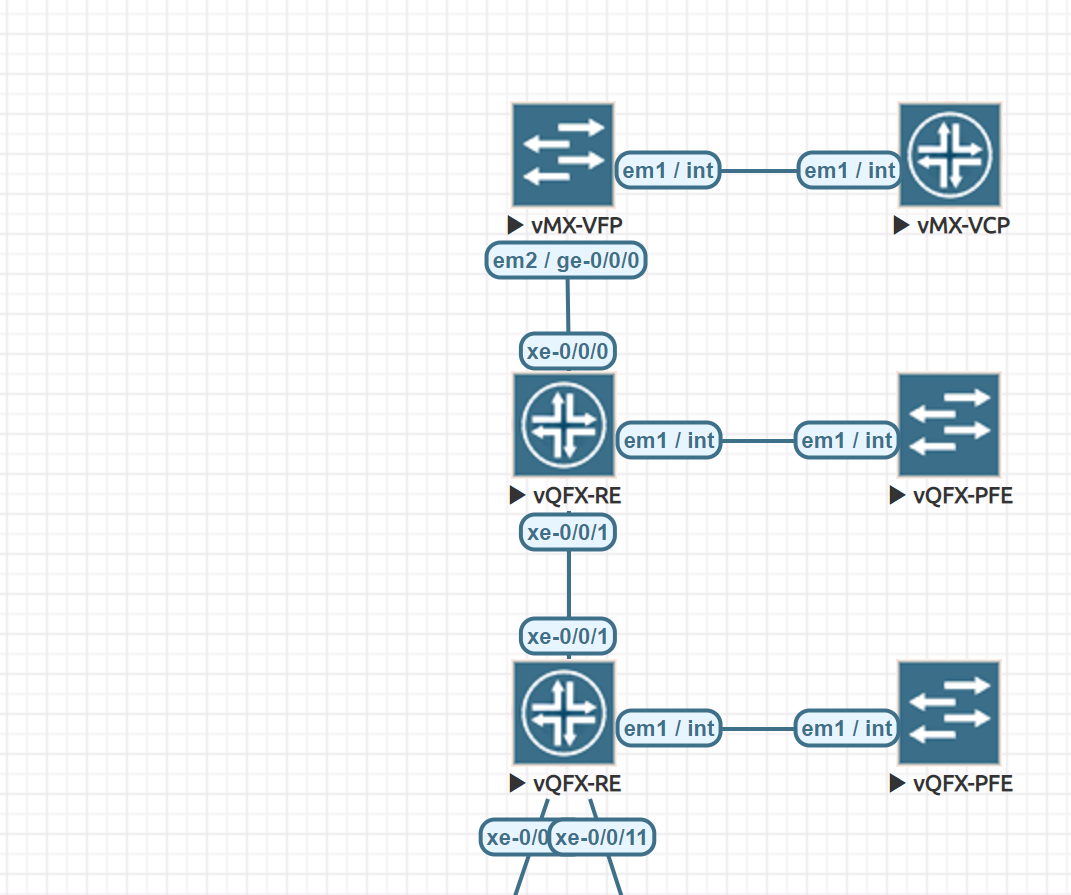
In this Topology, the network 172.16.1.x/24 is behind vMX-VFP6 (VPC8) and the network 172.16.2.x/24 is behind vMX-VFP4 (VPC7). Our middle Router, vMX-VFP5/ vMX-VCP2 is not aware of the 172 networks and has no route at all towards the networks. VCP1 and VCP3 are out Tunnel-Endpoints and are configured like this:
VCP-1:

set system root-authentication encrypted-password "$6$PyP6cuVZ$HY8kv92ln9xXdkJEIp0EyI1PBie4/oH//pxBi9gau2.scpFFuAcu8620bpLk3TuhABQGuVDQ5Dgx7.b64GKDT1"
set chassis fpc 0 pic 0 tunnel-services bandwidth 10g
set interfaces ge-0/0/0 unit 0 family inet address 192.168.0.5/30
set interfaces gr-0/0/0 unit 0 tunnel source 10.10.10.1
set interfaces gr-0/0/0 unit 0 tunnel destination 10.10.10.2
set interfaces gr-0/0/0 unit 0 tunnel allow-fragmentation
set interfaces gr-0/0/0 unit 0 tunnel path-mtu-discovery
set interfaces gr-0/0/0 unit 0 family inet address 172.16.0.1/30
set interfaces ge-0/0/6 unit 0 family inet address 172.16.2.1/24
set interfaces lo0 unit 0 family inet address 10.10.10.1/32
set routing-options static route 0.0.0.0/0 next-hop 192.168.0.6
set routing-options static route 172.16.1.0/24 next-hop gr-0/0/0.0

root> show route

inet.0: 9 destinations, 9 routes (9 active, 0 holddown, 0 hidden)
+ = Active Route, - = Last Active, * = Both

0.0.0.0/0          *[Static/5] 00:17:48
                    >  to 192.168.0.6 via ge-0/0/0.0
10.10.10.1/32      *[Direct/0] 00:22:52
                    >  via lo0.0
172.16.0.0/30      *[Direct/0] 00:06:16
                    >  via gr-0/0/0.0
172.16.0.1/32      *[Local/0] 00:06:16
                       Local via gr-0/0/0.0
172.16.1.0/24      *[Static/5] 00:06:16
                    >  via gr-0/0/0.0
172.16.2.0/24      *[Direct/0] 00:11:25
                    >  via ge-0/0/6.0
172.16.2.1/32      *[Local/0] 00:11:25
                       Local via ge-0/0/6.0
192.168.0.4/30     *[Direct/0] 00:18:16
                    >  via ge-0/0/0.0
192.168.0.5/32     *[Local/0] 00:18:16
                       Local via ge-0/0/0.0

inet6.0: 1 destinations, 1 routes (1 active, 0 holddown, 0 hidden)
+ = Active Route, - = Last Active, * = Both

ff02::2/128        *[INET6/0] 00:26:42
                       MultiRecv
VCP-2:
set system root-authentication encrypted-password "$6$Tc7j6QVB$UQ4WzeKUlcwMyIzJRo4WtRW4/WMAhWlWC/6Pd6RwYatXqEKf40vJxAq28TAnRAsuS8BQugOtyopVSs7nUARbY0"
set interfaces ge-0/0/0 unit 0 family inet address 192.168.0.6/30
set interfaces ge-0/0/2 unit 0 family inet address 192.168.0.2/30
set routing-options static route 10.10.10.1/32 next-hop 192.168.0.5
set routing-options static route 10.10.10.2/32 next-hop 192.168.0.1
root> show route
inet.0: 6 destinations, 6 routes (6 active, 0 holddown, 0 hidden)
+ = Active Route, - = Last Active, * = Both
10.10.10.1/32 *[Static/5] 00:14:33
> to 192.168.0.5 via ge-0/0/0.0
10.10.10.2/32 *[Static/5] 00:14:33
> to 192.168.0.1 via ge-0/0/2.0
192.168.0.0/30 *[Direct/0] 00:20:37
> via ge-0/0/2.0
192.168.0.2/32 *[Local/0] 00:20:37
Local via ge-0/0/2.0
192.168.0.4/30 *[Direct/0] 00:19:36
> via ge-0/0/0.0
192.168.0.6/32 *[Local/0] 00:19:36
Local via ge-0/0/0.0
inet6.0: 1 destinations, 1 routes (1 active, 0 holddown, 0 hidden)
+ = Active Route, - = Last Active, * = Both
ff02::2/128 *[INET6/0] 00:26:51
MultiRecvVCP-3:
set system root-authentication encrypted-password "$6$qe4r6bQM$d/hjo5m/HEiAu4NT47CKzu7S2sxDNczJCfJ0SRQN7/SEnVEoLNekLkhJPZ20aR7K4x0MmIY.mpvPhphvGrPNo."
set chassis fpc 0 pic 0 tunnel-services bandwidth 10g
set interfaces gr-0/0/0 unit 0 tunnel source 10.10.10.2
set interfaces gr-0/0/0 unit 0 tunnel destination 10.10.10.1
set interfaces gr-0/0/0 unit 0 tunnel allow-fragmentation
set interfaces gr-0/0/0 unit 0 tunnel path-mtu-discovery
set interfaces gr-0/0/0 unit 0 family inet address 172.16.0.2/30
set interfaces ge-0/0/2 unit 0 family inet address 192.168.0.1/30
set interfaces ge-0/0/6 unit 0 family inet address 172.16.1.1/24
set interfaces lo0 unit 0 family inet address 10.10.10.2/32
set routing-options static route 0.0.0.0/0 next-hop 192.168.0.2
set routing-options static route 172.16.2.0/24 next-hop gr-0/0/0.0
root> show route
inet.0: 9 destinations, 9 routes (9 active, 0 holddown, 0 hidden)
+ = Active Route, - = Last Active, * = Both
0.0.0.0/0 *[Static/5] 00:17:46
> to 192.168.0.2 via ge-0/0/2.0
10.10.10.2/32 *[Direct/0] 00:21:50
> via lo0.0
172.16.0.0/30 *[Direct/0] 00:06:31
> via gr-0/0/0.0
172.16.0.2/32 *[Local/0] 00:06:31
Local via gr-0/0/0.0
172.16.1.0/24 *[Direct/0] 00:12:04
> via ge-0/0/6.0
172.16.1.1/32 *[Local/0] 00:12:04
Local via ge-0/0/6.0
172.16.2.0/24 *[Static/5] 00:06:31
> via gr-0/0/0.0
192.168.0.0/30 *[Direct/0] 00:21:14
> via ge-0/0/2.0
192.168.0.1/32 *[Local/0] 00:21:14
Local via ge-0/0/2.0
inet6.0: 1 destinations, 1 routes (1 active, 0 holddown, 0 hidden)
+ = Active Route, - = Last Active, * = Both
ff02::2/128 *[INET6/0] 00:26:44
MultiRecvFirst you configure a gr-Interface with a tunnel source and destination.
You also should have a static route to reach the other side of your endpoint!
As you can see in the routing table, VCP2 is not aware of the 172 networks and still VPC7 and VPC8 can issue a ping towards each other, with vPC7 having 172.16.2.100/24 and VPC8 having 172.16.1.100/24 as the host addresses.
Setting up GRE-Tunnels is extremely easy. This allows you to tunnel your networks through your Provider network. But be careful – GRE is not IPsec – especially in terms of security.
Although GRE is able to carry other protocols as well as IP packets in an IP network while IPSec is not, IPsec offers more security than GRE because of its authentication feature.
But do you know the best part? This Lab was done in 6 Minutes (5.5 minutes boot time and the rest configuring) with EVE-NG. As you may have heard, I will soon present a short session about how to use EVE for prepping and labbing – if any of you attend the #NXTWORK2019 you need to check out the Ambassadors Masterclass – especially if you currently use ESX for labbing…
A couple of hours ago, EVE-NG Pro 2.0.6-6 was released introducing the new Dark-Mode.
In my opinion, this is great when labbing at night because your eyes don’t need to adjust between the flashy white background from eve-ng and the dark background of your ssh-Application.
I recently also tried out the Link-Suspension Feature and boy is this great 🙂
All the Juniper Gear I tested so far is working fine with the Link suspension, allowing you to test even more scenarios than before. I will also show you this shiny feature in Vegas at the #NXTWORK2019.
If you are there, make sure to check out our Masterclass 🙂
Can’t wait to meet you all – let’s talk about Tech or just about EVE.
And don’t worry – as far as I know, none of us has ever bitten a human – feel free to talk to us 🙂

Have you ever noticed that your vSRX, vMX and vQFX run on insane CPU percentage?
Well yes, you might think because on DPDK Hosts (I wrote about that earlier), the v-Devices run in “Poll-Mode”. But that doesn’t mean, you can’t try to “improve” this behavior.

CAUTION: I tried this myself and have not seen any issues so far – however, this does not guarantee fatal possible side-effects, that I’m unaware of or that do not affect my Labs. If you mess with your EVE, you are on your own so try it and if it works fine, if not you should probably change it back or wait for the official release from the EVE-NG Team if this turns out to be working and they feel the need to implement this. I only tried this with “Pure-Juniper” Labs so far.
In my Test-Setup (1 vMX and 2 vQFX) my CPU went from 35% to below 16% (EVE on ESX).
I think Bare (which I will try next) will show the same if not more drops in the CPU usage.
Update 02.09.2019 – Yes. Bare was even more crazy, allowing me to run 40vQFX at the same time at roughly 70% CPU usage!!!! Insane :O
Also, there was no need to reboot the host.
Here’s what I changed:
echo 0 | sudo tee /sys/module/kvm/parameters/halt_poll_ns and
root@eve-ng:~# vim /etc/modprobe.d/kvm.conf (this file will be created)
options kvm halt_poll_ns=0
Let me know in the comments or on Twitter if this also worked for you and if you see any side effects please also let me know.
Heres some background in case you wonder, what this does:
https://www.kernel.org/doc/Documentation/virtual/kvm/halt-polling.txt
The interesting Part for me was the Notes at the end:
Care should be taken when setting the halt_poll_ns module parameter as a
large value has the potential to drive the cpu usage to 100% on a machine which
would be almost entirely idle otherwise.
Sounds like the v-Devices, right? 😉
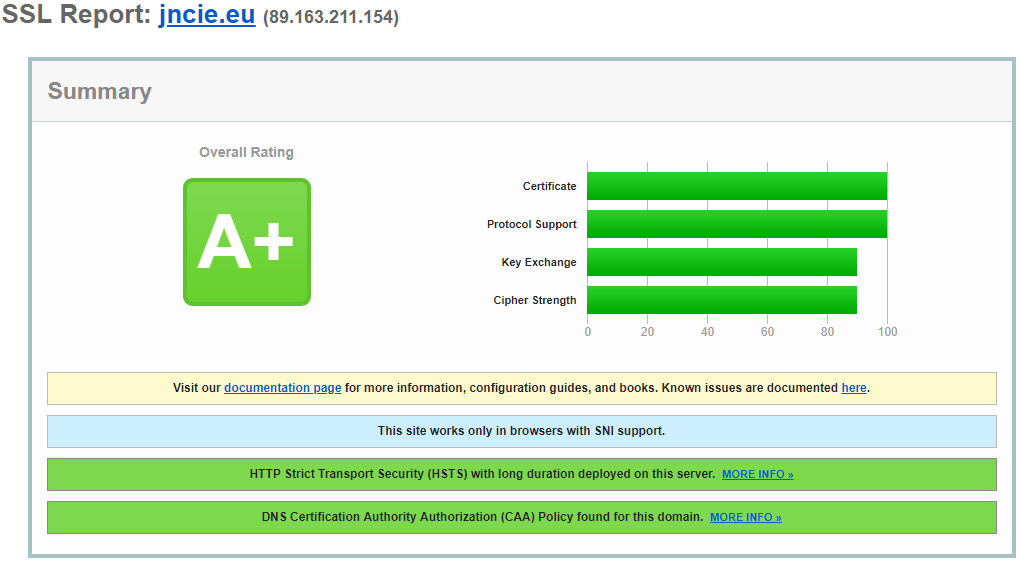
For me, it is always important, to make my blog safe for readers and avoid nearly all possibilities for nasty folks to do nasty things 😉
No Website is 100% secure of course but I try my best to improve my Servers every day.
Therefore I now only serve this Website over TLS 1.2 until TLS1.3 is officially supported through the default repositories. TLS 1.0 and TLS1.1 are rarely used and therefore I think it’s safe to disable them. If you face issues, feel free to contact me.
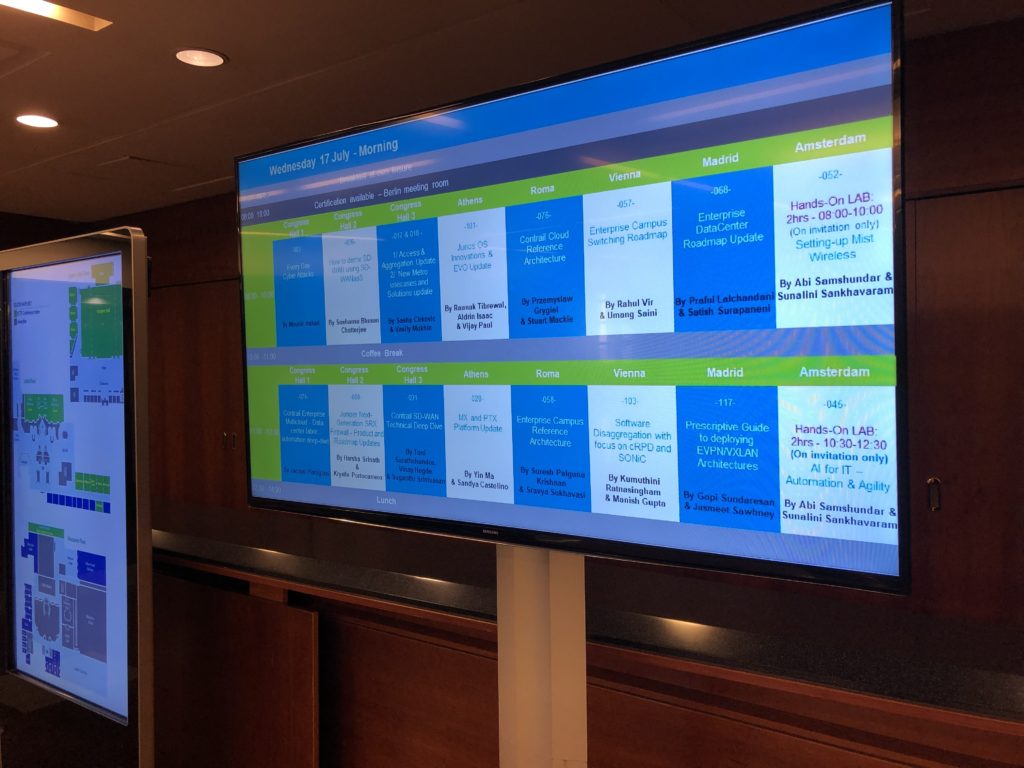
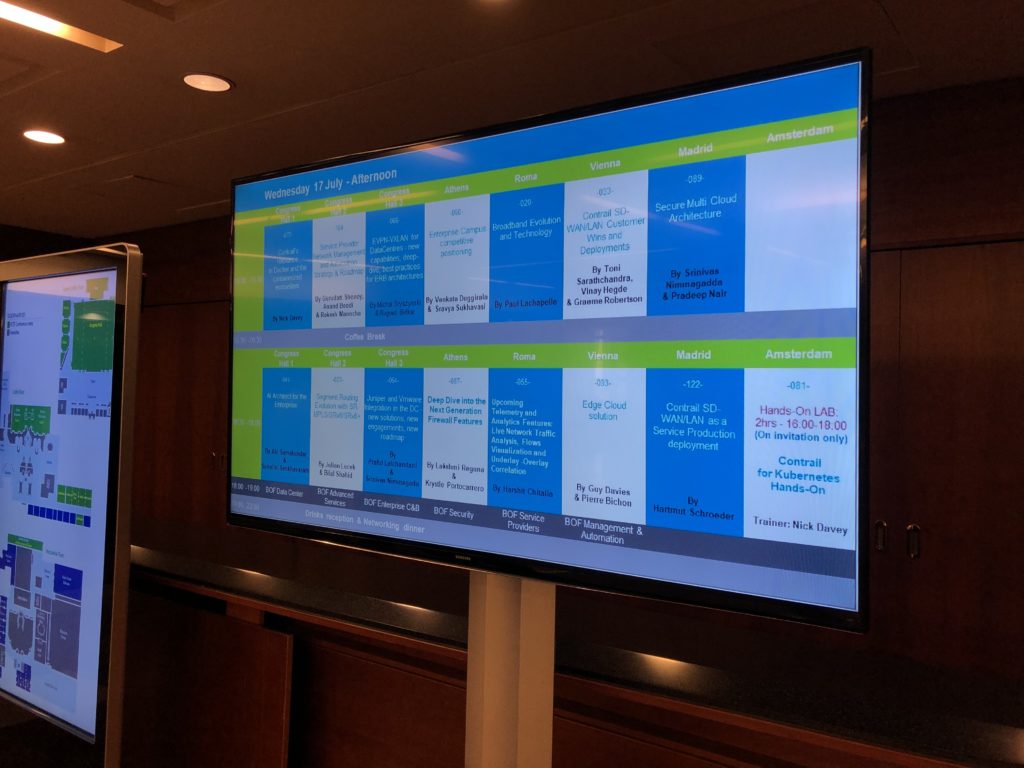
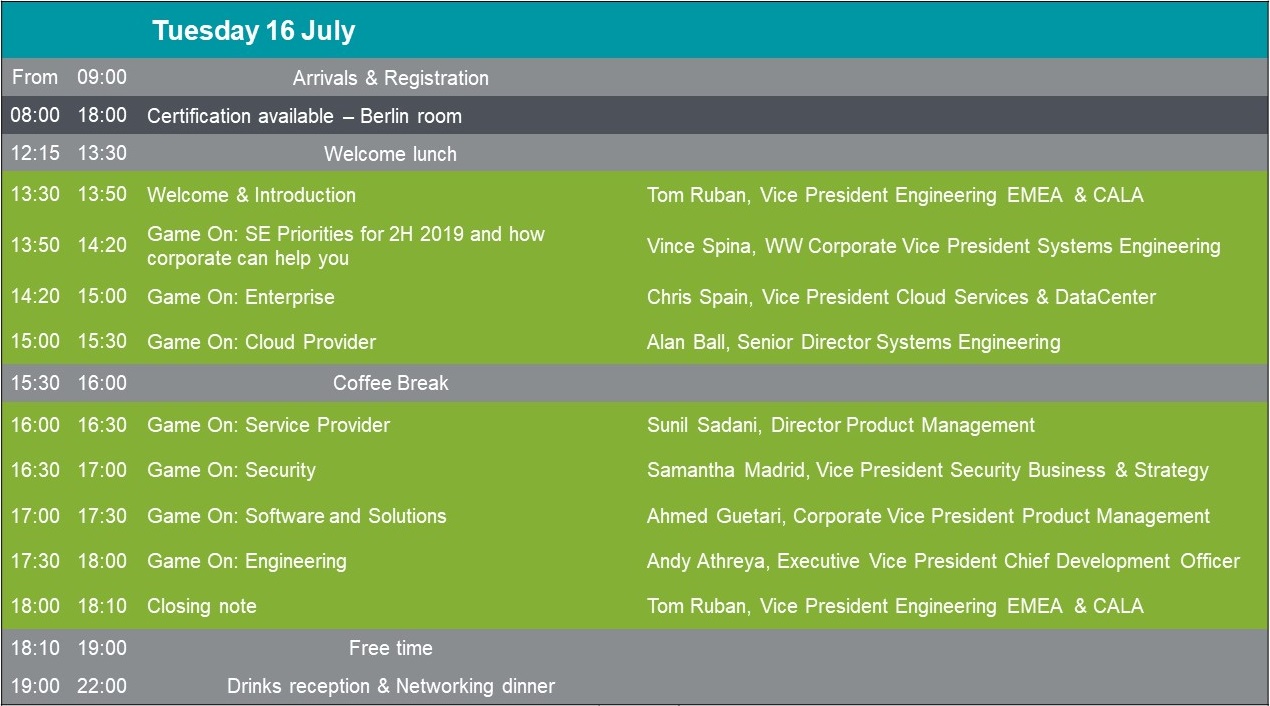
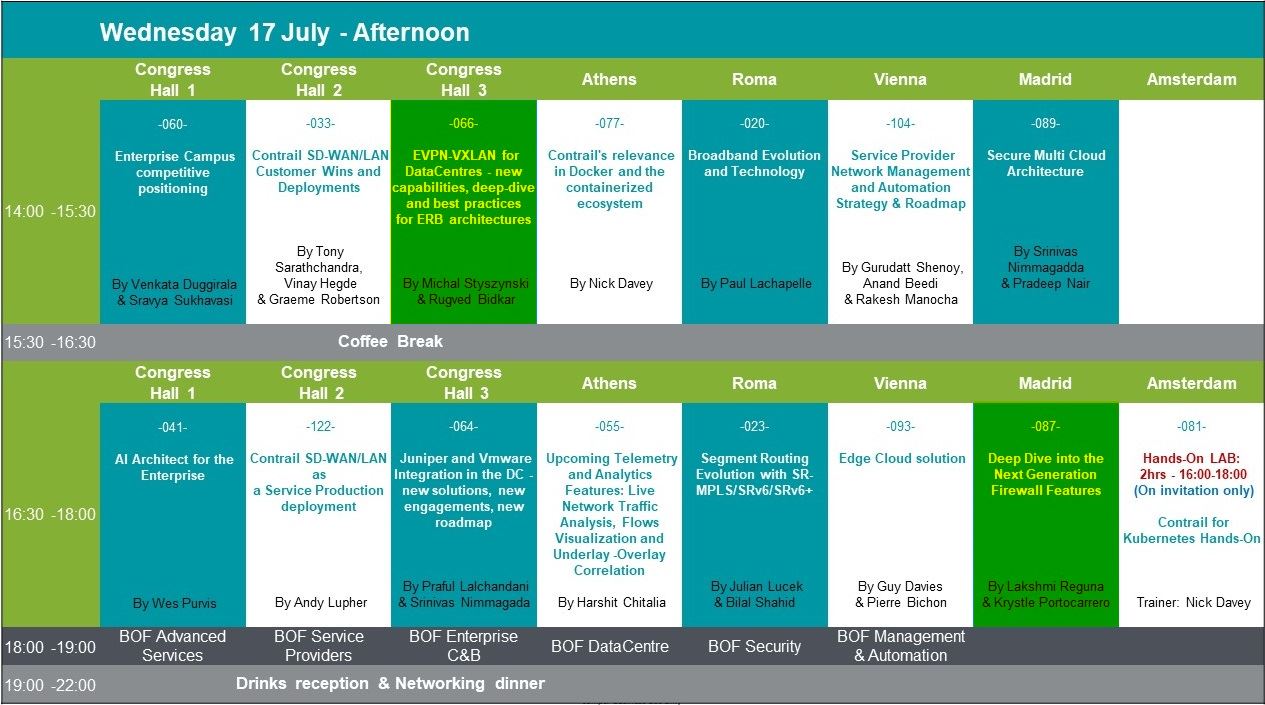
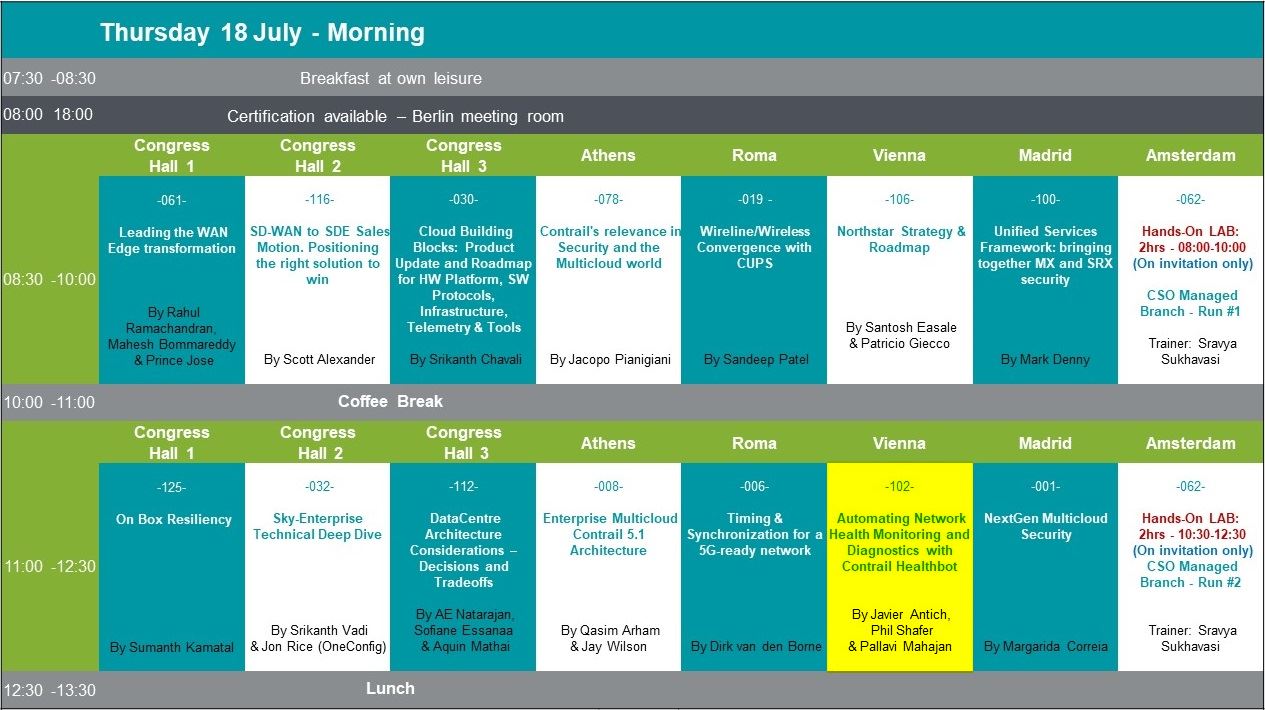
Here you find the Agenda for the EMEA & CALA Tech Fest 2019.
This Post will be updated by me if anything changes during the Event (Room Names, Slots, etc.) so feel free to bookmark this Page. I will also write Articles every evening so make sure to check them out 🙂
Last Edited: 12.07.2019, 15.32 (CEST)
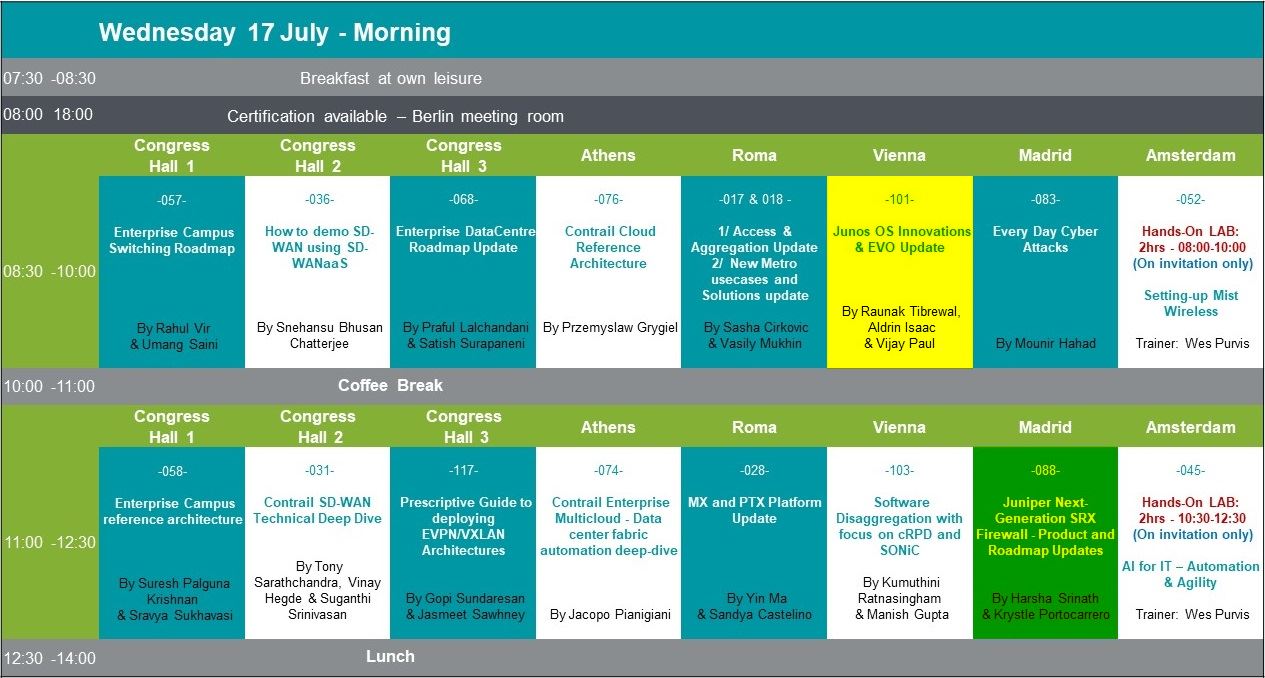

Make sure to visit the Certification booth (pre-registration recommended) to get your (re)certifications ready.
Meeting room for Certification is ‘Berlin’.
Looking forward to meeting all of you in Prague 🙂
Below you will find the Updated rooms: